 Georgia

If your backyard feels like a furniture pile instead of a real outdoor room, the problem usually isn’t the furniture — it’s the lack of structure. Not structure in the motivational sense, but literal physical structures: pergolas, gazebos, shade sails, grill stations, and defined zones that tell you (and your guests) exactly where to cook, where to sit, and where to escape the sun. The backyards that look effortlessly pulled-together on Pinterest aren’t bigger or more expensive than yours. They’re just organized around a logic that most design articles never bother to explain.
This guide breaks down 11 specific outdoor structure ideas — verified products, real materials, and sequencing advice — that turn a scattered patio into a multi-zone backyard that functions like an outdoor home. Each section addresses one piece of the puzzle: the cooking zone, the dining zone, the shade zone, and the connective tissue between them.
1. Anchor the Cooking Zone with a Freestanding Grill Canopy
 Save
The cooking zone is where most backyard layouts go wrong first. People place the grill wherever the gas line is or wherever it’s convenient, then arrange everything else around it — and end up with a backyard where guests crowd the cook, smoke drifts over the seating, and there’s nowhere to put a hot pan down. A freestanding grill canopy structure solves this by doing two things at once: it creates a defined footprint for the cooking zone and signals to guests where that zone ends.
From the guides
You've saved it, wanted it. Here's the how: codes, measurements, order. Your choices make it yours.
 The Japandi Honest PlaybookThe honest version of the style: what to keep, what to skip, and the order to do it in.See inside →
 The Room Refresh PlaybookA repeatable four-step method, room by room, in ten minutes, thirty minutes, or one weekend.See inside →
 Make Any Room Feel Cozy on PurposeWhy some rooms hold people and others empty out, and the moves that change it.See inside →
A basic grill canopy doesn’t need to be custom-built. Pre-engineered aluminum or steel frame canopy shelters in the 10×10 or 12×12 size range mount over an existing concrete pad or pavers and cost a fraction of a permanent structure. Look for units with a polycarbonate or metal roof rated for your climate. The canopy creates shade for the cook, keeps light rain off the grill, and — critically — gives you a visual boundary that separates the heat zone from the dining zone. Add a floating side shelf or utility cabinet underneath for prep space and tool storage.
Key Takeaway: A dedicated grill canopy creates a cooking zone boundary that improves both traffic flow and smoke management — it’s the single most functional structure investment in a multi-zone backyard.

2. Use a Hardtop Gazebo to Frame the Dining Zone
 Save
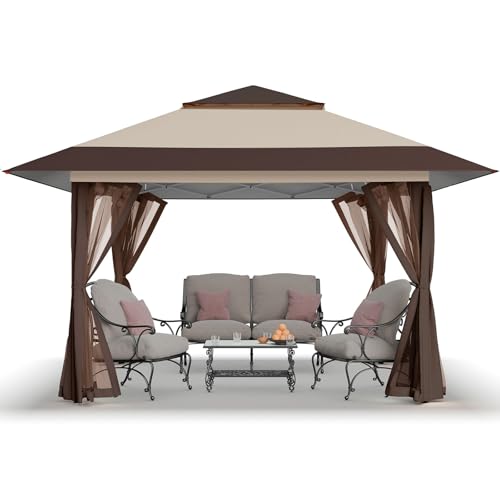
The dining zone needs shelter more than any other zone, because it’s where people sit still the longest. A hardtop gazebo — as opposed to a fabric-top pop-up or a pergola — provides year-round weather protection that makes the dining zone feel like a real room extension of the house. The solid or polycarbonate roof means you can dine during light rain, and the permanent frame allows you to run string lights, hang a ceiling fan, or mount a side curtain track for privacy.
For a standard dining set that seats six to eight, a 12×14 or 12×12 footprint works well. Steel or aluminum frame constructions are the practical choice — they don’t rot, they don’t require staining, and they hold up in wind better than fabric-roof alternatives. Position the gazebo at least 10–12 feet from the grill canopy so heat and smoke clear between zones. The gap between structures becomes a natural traffic lane.
Key Takeaway: A hardtop gazebo turns your dining zone from a rain-vulnerable furniture cluster into a defined outdoor room that functions in three seasons.

3. Define the Shade Lounge Zone with an Offset Cantilever Umbrella
 Save
Not every shade zone needs a permanent structure. For the lounging or reading area — the third zone in a well-organized backyard — a cantilever offset umbrella is often the right answer. Unlike center-pole umbrellas, offset cantilever models position the base outside the seating footprint, leaving the entire zone underneath the canopy unobstructed. You can pull two wide lounge chairs under a single 10- or 13-foot span without a pole in the middle.
The key spec to prioritize is the base weight and crank mechanism. Cheaper offset umbrellas tip in moderate wind and require two people to tilt. A quality unit — cast iron or fillable resin base at 130+ lbs, with a 360-degree rotation crank — stays put and adjusts as the sun moves. Position this zone on the opposite side of the yard from the grill canopy, or at a perpendicular angle to the dining gazebo, to complete the three-zone layout.
Key Takeaway: A cantilever umbrella delivers a defined shade-lounge zone without construction — the base placement outside the seating area is the detail that separates functional from awkward.

4. Separate Zones with a Freestanding Pergola and Climbing Plants
 Save
Pergolas serve a different structural purpose than gazebos or canopies: they define space without fully enclosing it. A freestanding pergola placed between your cooking zone and dining zone acts as a visual and physical divider — the kind that says “the BBQ is over there” without a wall. Open-slatted pergola roofs also support climbing plants (jasmine, wisteria, climbing roses) that add shade over time while softening the structure’s presence.
When using a pergola as a zone divider, orientation matters. Place it so that the longest side runs parallel to the boundary you’re defining. A 10×12 or 12×12 freestanding cedar or pressure-treated pine pergola can be built as a DIY kit or purchased as a pre-engineered assembly. Aluminum pergola kits now rival wood in finish quality and outperform wood in longevity — they don’t split, warp, or require annual sealing.
Key Takeaway: A freestanding pergola’s power is in zone definition, not weather protection — position it between zones as a divider, not as a destination in itself.

5. Install a Shade Sail Triangle to Cover the Gap Between Zones
 Save
One overlooked structural element in multi-zone backyards is the in-between space — the transition from cooking zone to dining zone or from dining to lounge. That uncovered gap is where guests cluster awkwardly in full sun. A shade sail triangle, tensioned between anchor points on two existing structures and one ground pole or fence post, creates a covered transition corridor that connects zones without enclosing them.
Shade sails are available in HDPE woven fabric rated for UV block (look for 90%+ UV blockage), and the triangle geometry allows them to span irregular anchor points that a square canopy couldn’t cover. Install hardware-grade stainless turnbuckles at each corner for proper tensioning — this is the step most DIY installations skip, and it’s why cheap sail installations sag and collect water. A 16×16×16-foot triangle covers a generous walkway or transition zone.
Key Takeaway: A shade sail triangle is the highest-value filler structure in a multi-zone layout — it connects your defined zones and eliminates the dead, sun-exposed gap between them.

6. Build a Defined Prep Station with an Outdoor Kitchen Cart or Island
 Save
The cooking zone structure isn’t just about overhead coverage — it’s about horizontal surface area. A grill alone doesn’t make a functional cooking zone. What separates a backyard BBQ setup from a proper outdoor kitchen zone is a dedicated prep surface: somewhere to rest a hot pan, stage marinade, or plate food without going back inside. An outdoor kitchen cart or modular island — with a stainless countertop, cabinet storage underneath, and side shelves — fills this gap without permanent construction.
Look for units rated for outdoor use with powder-coated or stainless exteriors, not standard indoor cabinetry with an outdoor finish sprayed on. Cabinet-style outdoor islands with closed storage are especially useful in the cooking zone because they keep propane, tools, and accessories out of sight. A rolling cart version gives you flexibility to reposition the zone seasonally.
Key Takeaway: A dedicated prep surface transforms your cooking zone from a single-purpose grill spot into a functioning outdoor kitchen — closed storage is the detail that keeps the zone looking intentional rather than cluttered.

7. Use Pavers or Decking to Anchor Each Zone to the Ground
 Save
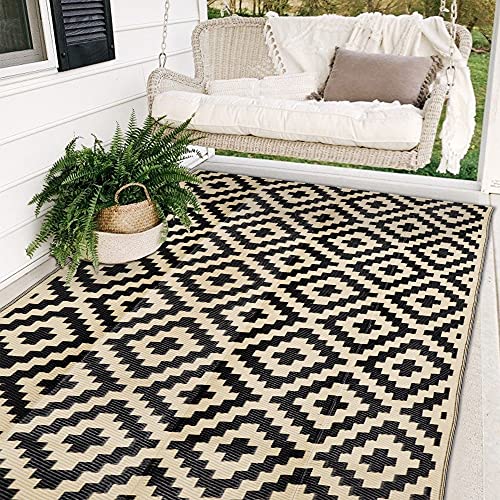
Surface materials do as much zone-defining work as any overhead structure. When each zone has its own distinct ground treatment — a concrete paver pad under the grill, herringbone brick under the dining table, composite decking or a large outdoor rug under the lounge chairs — the zones feel architecturally intentional even before any structure goes up overhead. The ground plane is the first signal that tells a guest “this is where dining happens.”
Pavers and decking don’t require a contractor for small-zone applications. Interlocking concrete pavers or porcelain pavers can be laid on a compacted gravel base as a DIY project. For renters or those avoiding permanent installations, large-format outdoor rugs (8×10 or larger) on an existing concrete patio create the same zone-defining visual signal without permanence. The rule of thumb: the rug or paver pad should extend at least 18 inches beyond the furniture footprint on all sides.
From the guides
You've saved it, wanted it. Here's the how: codes, measurements, order. Your choices make it yours.
The Japandi Honest PlaybookThe honest version of the style: what to keep, what to skip, and the order to do it in.See inside →The Room Refresh PlaybookA repeatable four-step method, room by room, in ten minutes, thirty minutes, or one weekend.See inside →Make Any Room Feel Cozy on PurposeWhy some rooms hold people and others empty out, and the moves that change it.See inside →Key Takeaway: Ground surface is the lowest-effort, highest-visual-impact zone-defining tool — anchor every zone to its own surface material before adding any overhead structure.
8. Add a Privacy Screen to Back the Cooking Zone
 Save
A privacy screen does double duty in the cooking zone: it shields the cook from wind (which affects grill temperature more than most people expect) and it creates a defined back wall for the zone — turning an open-ended area into something that reads like an outdoor room. Without a back wall, cooking zones feel exposed and unfinished regardless of what overhead structure you add.
Freestanding panel privacy screens are available in cedar, pressure-treated pine, and powder-coated aluminum — some in modular configurations that link panel-to-panel. For cooking zone placement, position the screen on the windward side of the grill (check your dominant wind direction, usually west or southwest in North America) so it acts as a natural wind block. Aim for at least 6 feet of height to provide meaningful coverage without requiring a permit in most municipalities.
Key Takeaway: A privacy screen behind the grill solves wind interference and creates the “back wall” that makes your cooking zone feel like a room — the most underused structural element in outdoor zone design.

9. Hang a Retractable Awning Over the Transition Between House and Patio
 Save
For backyards where the house wall is part of the zone layout, a retractable awning over the back door transition creates a covered “foyer” that connects indoor to outdoor. This is the structural solution for the awkward space between the sliding glass door and the first defined outdoor zone — a space that usually becomes a dead zone of forgotten chairs and potted plants on bare concrete.
A motorized retractable awning (manual crank models work equally well) mounts to the fascia board of the house and extends 10–14 feet over the patio. When retracted, it disappears against the house. Cassette-style models protect the fabric when retracted, extending the lifespan significantly over open-arm alternatives. This structure defines the indoor-to-outdoor transition zone without permanent construction and doesn’t require a ground footprint.
Key Takeaway: A retractable awning is the right structure for the house-adjacent transition zone — it creates a covered entry to your outdoor room layout without consuming any ground-level footprint.

10. Define the Dining Zone with String Lights Suspended Between Structures
 Save
String lights suspended overhead are one of the most effective low-cost tools for defining a dining zone — especially at the overlap point where two zones might otherwise blur together. A string light canopy stretched between a pergola post, the house fascia, or shepherd’s hook poles creates a soft ceiling that marks the dining zone’s boundary as clearly as any gazebo roof, at a fraction of the cost.
The key is using the light span to match the dining table footprint — extend the canopy at least 2 feet beyond the table edges on all sides. G40 globe string lights on a 48-foot strand are the right scale for a standard dining zone; the larger globe size reads as architectural rather than decorative at 8–10 feet of height. Use weatherproof rated strands and proper mounting hardware — clip-style hangers on a catenary wire, not directly through the bulb socket, to prevent strand sag.
Key Takeaway: String lights suspended overhead on a catenary wire create a defined dining zone ceiling for under a fraction of permanent structure costs — mount them to match the exact footprint of your dining table, not the surrounding area.

11. Sequence Your Three Zones in the Right Order
 Save
All the structures in sections one through ten fail if they’re placed in the wrong order. The most common sequencing mistake in multi-zone backyards is placing the cooking zone adjacent to the dining zone, which forces guests to either crowd the cook or sit in smoke. The correct sequencing logic is: cooking zone at the edge or rear of the yard (near the utility connection and fence, away from the main seating), dining zone in the center-rear (close enough to the kitchen for plating, far enough from the grill for comfort), and shade lounge zone in the foreground (the first zone guests encounter from the house, close to the indoor transition).
This three-zone order creates a natural flow: guests arrive and relax in the lounge zone while the cook works in the dedicated grill zone at the rear, then everyone migrates to the dining zone when food is ready. The dining zone acts as the hub — it’s naturally between the lounge and the cook, so movement feels instinctive rather than choreographed. Connecting the three zones with pavers, a shade sail transition, or simply a clear lawn path makes the layout legible even to first-time guests.
Key Takeaway: Structure placement sequencing — cooking at the rear, dining in the center, lounge in the foreground — is the one decision that determines whether your multi-zone backyard functions or frustrates.
A well-structured backyard isn’t about having more furniture or a bigger budget — it’s about establishing a clear logic that each zone follows. Start with the ground surface to anchor each zone, add the overhead structure that matches its function (canopy for cooking, gazebo for dining, umbrella for lounge), and use in-between elements like shade sails, pergolas, and privacy screens to connect and define the transitions. The sequencing rule in section eleven is where most backyards either succeed or stay frustrating — get the order right, and everything else falls into place. Pick the one structure that solves your biggest current problem and start there. The rest of the layout builds naturally once the first zone has a defined home.
From the guides
You've saved it, wanted it. Here's the how: codes, measurements, order. Your choices make it yours.
The Japandi Honest PlaybookThe honest version of the style: what to keep, what to skip, and the order to do it in.See inside →The Room Refresh PlaybookA repeatable four-step method, room by room, in ten minutes, thirty minutes, or one weekend.See inside →Make Any Room Feel Cozy on PurposeWhy some rooms hold people and others empty out, and the moves that change it.See inside → Save


