 Georgia
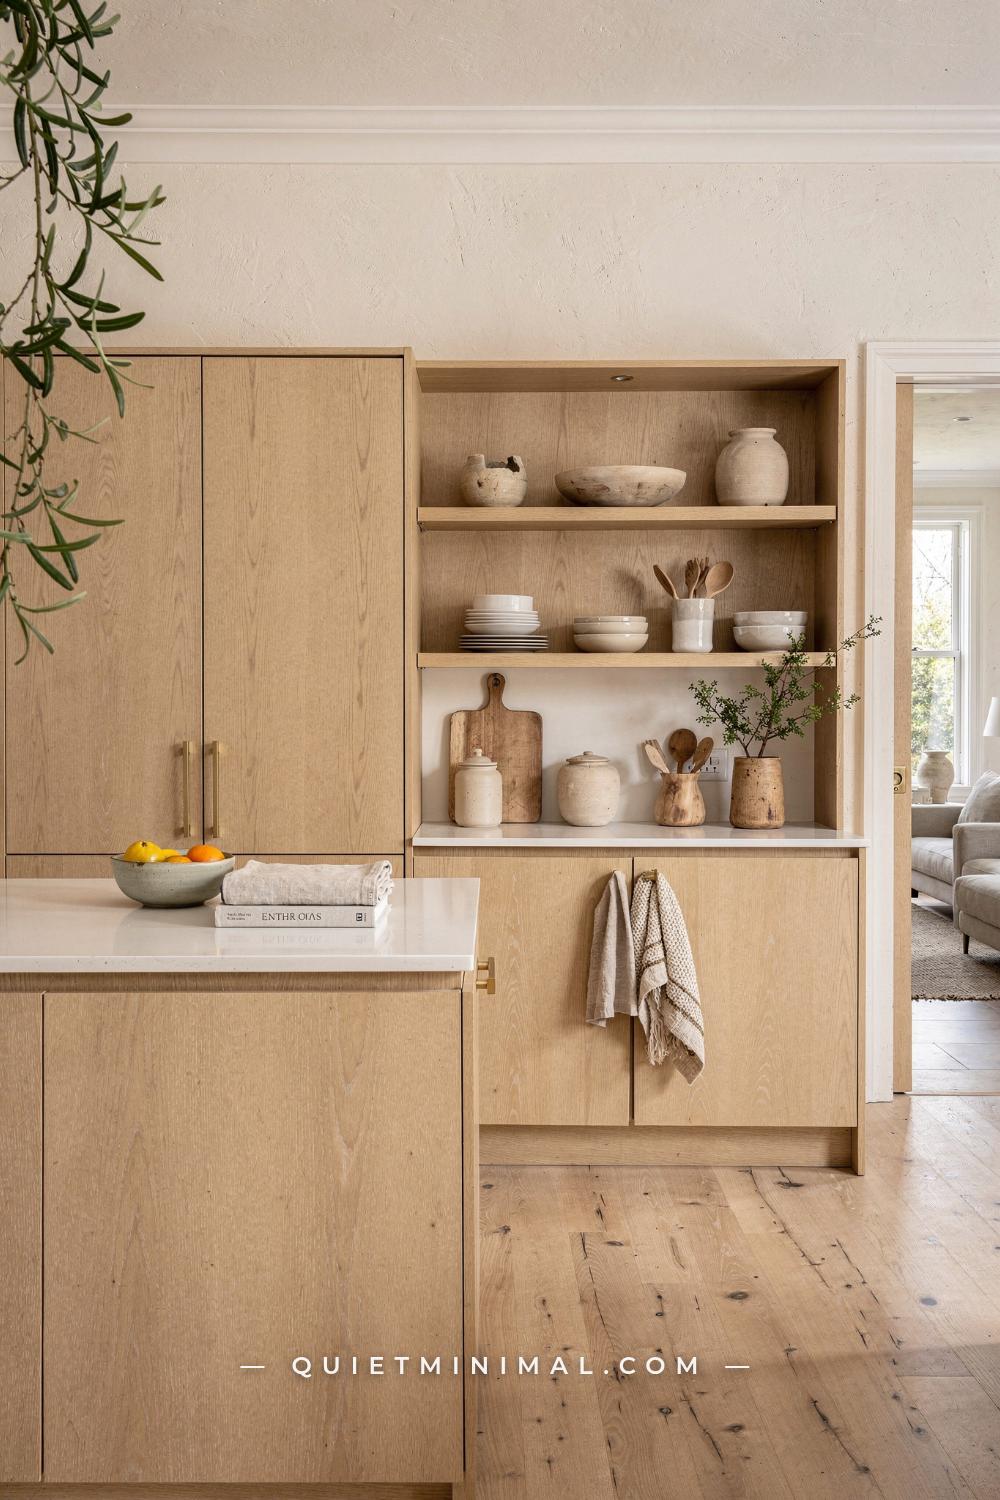
You want a kitchen that feels calm, purposeful, and genuinely lived-in. Not sterile. Not bare. Not that flat, cold kind of minimal that looks like a hotel lobby. A real Scandinavian kitchen has warmth running through every decision: the wood species you choose, the hardware finish, the way light lands on a matte surface at 7 a.m. on a Tuesday. Getting there is not about picking pieces you like and hoping they add up. It is about making decisions in the right order, so each choice you lock in shapes the one that comes after. This guide walks you through the full build sequence, from setting your palette to placing the final styling prop. Skip a step, and you end up with a kitchen that looks assembled rather than designed. Follow the sequence, and the finish line takes care of itself.
Step 1: Commit to Your Base Palette Before You Touch Anything Else
 Save
Every mistake in a Scandinavian kitchen can be traced back to one thing: starting with cabinetry before settling the base palette. The palette is not just the wall color. It is the chromatic temperature of the entire room. Get it wrong, and you spend the next two years buying things that almost work.
The Scandinavian palette today has moved meaningfully away from cool white. The all-white Nordic interior is stepping aside. Nordic design now runs warmer, more tactile, and more personal, softened by honey-toned woods and a renewed focus on materials that develop character over time. That means your base palette should be built from warm neutrals: think oatmeal, pale linen, warm greige, or a soft putty. These are not beige in the dated, 2005 sense. They are whites with a yellow or pink undertone that let natural wood read as warm rather than competing with a cool backdrop.
For walls, two colors are worth testing directly on your wall before committing: Shaded White by Farrow and Ball, which is an off-white with a faintly warm, dusty tone that holds up in both north- and south-facing rooms, and Seapearl by Benjamin Moore, a creamy, slightly muddy white that has appeared across multiple designer-owned kitchens and holds warmth without tipping yellow. Paint a 24-by-24-inch (61-by-61-cm) swatch in three places in the room: the wall behind the cabinets, the wall that gets morning light, and the wall that only gets ambient light. Live with each for 48 hours before deciding.
The failure mode here is choosing a palette that looks right on a phone screen but reads differently in your kitchen’s specific light. Artificial light with a color temperature below 3,000K will push any warm white toward yellow. Set your palette before ordering anything else.
Key Takeaway: Lock your wall color using painted swatches in three different light zones of your actual kitchen before you select a single cabinet finish.

Step 2: Choose Your Wood Species and Finish
 Save
Wood is the material that makes a Scandinavian kitchen feel alive rather than printed from a catalog. But “natural wood” covers an enormous range, and the species and finish you choose will determine whether the room feels like a Copenhagen apartment or a 2012 builder-grade renovation.
Golden oak has replaced the pale birch of the past decade as the signature Nordic wood today. If you are starting from scratch with new cabinetry, honey-toned white oak with a matte oil or lightly lacquered finish is the direction the market has moved. The key is matte. A satin or semi-gloss clear coat over oak will read as a manufactured cabinet, not a crafted one. Oil finishes let the grain breathe visually and develop a patina over years rather than wearing through to bare wood.
If you are working with existing cabinets in a lighter birch or maple, you are not locked into refinishing. The finish matters more than the species. Birch with a warm-toned matte varnish in a honey or amber wash will read close to white oak in most light conditions. What kills the effect is a very pale, almost ash-gray wood treatment. Avoid overly orange or reddish tints as well: the defining quality of the current Nordic wood tone is golden warmth without veering into the orange-red spectrum that dates a room.
If your kitchen has zero wood cabinets and you are working within a rental or tight budget, bring wood in through a floating shelf or a single open-shelf unit. Even 24 inches (61 cm) of natural oak on one wall will set the material temperature for the whole room. The shelf does not need to do heavy lifting. It needs to establish that wood is present.
Do not mix more than two wood tones in a Scandinavian kitchen without a designer anchoring the third. Two tones with a clear hierarchy, one dominant and one accent, are the limit before the room starts reading as unfocused.
Key Takeaway: Select honey-toned white oak with a matte oil finish as your primary wood, and never introduce a third wood tone without a clear plan for how all three relate in tone and texture.

Step 3: Decide on Flat-Panel or Shaker Cabinet Doors
 Save
Cabinet door style is not purely aesthetic. It determines how busy the room feels at full scale and how much the kitchen will show wear over time. In a Scandinavian kitchen, the two options worth considering seriously are flat-panel (also called slab-front) and shaker.
Flat-panel doors are the default in Danish and Swedish kitchens for a reason. They keep the eye moving across a continuous surface rather than stopping at each shadow line. In a smaller kitchen, this continuity makes the space read as larger than it is. Flat-panel doors in white oak or painted in a warm neutral are a near-guarantee of a clean, intentional result.
Shaker doors work in a Scandinavian kitchen only when the rail-and-stile profile is narrow. A classic American shaker with a 2.5-inch (6.3-cm) rail width introduces too much visual furniture and begins to pull the room toward a farmhouse or cottage direction. A Scandinavian-adjacent shaker typically has a 1.25-to-1.75-inch (3.2-to-4.4-cm) rail, sometimes called a “slim shaker” or “Nordic shaker” profile. This is the difference between a door that reads as ornamental and one that reads as structured.
A third option gaining real traction today is fluted or slatted wooden doors, which offer a dynamic alternative to flat-front cabinetry by bringing depth and rhythm through the vertical or horizontal reed pattern. Fluted fronts work best on a single run of base cabinets or a kitchen island where you want one material moment. Applied to every door in the kitchen, they quickly become visually loud, which is the opposite of what a Scandinavian kitchen is after.
The failure mode with flat-panel in particular is choosing too thin a door. Anything under 0.75-inch (1.9-cm) thickness will flex slightly over time and the reveals between doors will look inconsistent within two years. If you are pricing custom or semi-custom cabinetry, specify 0.75-to-1-inch (1.9-to-2.5-cm) door thickness.
Key Takeaway: Use flat-panel doors as your default for maximum cohesion, or a slim-rail shaker if you want a soft structural detail, and never apply fluted fronts to more than one cabinet run.

Step 4: Set the Countertop Material and Thickness
 Save
The countertop is where most Scandinavian kitchens go wrong because it is the most expensive element to replace and therefore the one people overthink into a bad decision. The material decision comes down to four honest options: white quartz, honed marble, matte laminate in a stone look, and solid oak or butcher block.
White quartz with a subtle movement is the most reliable all-conditions choice. Look for a slab with a light gray or warm beige vein rather than a strong graphic vein pattern. A dramatic vein works in a maximalist kitchen. In a Scandinavian kitchen, it competes with the wood for visual priority. Brands like Silestone and Caesarstone both produce quiet, lightly veined white quartz in the OC-30 to OC-17 light value range that reads correctly in a warm Nordic palette.
Honed marble is the elevated choice and the higher-maintenance one. Honed (not polished) Carrara or Calacatta Borghini marble will sit beautifully against warm oak cabinets because the soft, almost chalky surface texture mirrors the matte finish of the wood. The realistic expectation: marble etches from acidic liquids (lemon juice, tomato, coffee) within weeks of installation if it is unsealed or under-sealed. A penetrating sealer applied every 12 months will reduce but not eliminate this. If you cook daily and do not want to manage a material, quartz is the right call.
Matte laminate in a stone-look finish has improved enough in the last four years that it is no longer a compromise. Brands like Wilsonart and Formica produce honed stone-look laminates at a fraction of the slab cost. The visual seam at joins is more visible than in quartz, so plan the layout so joins fall under an appliance or in a low-visibility corner.
Countertop thickness matters more than most guides admit. A standard 0.75-inch (1.9-cm) quartz top works technically, but the 1.25-inch (3.2-cm) thick version adds a sense of substance that reads correctly in a Scandinavian kitchen where material quality is the point. The 1.5-to-2-inch (3.8-to-5-cm) waterfall edge on an island can work but only if the island’s base wood and the slab share a tonal relationship. A warm oak island with a cool blue-gray slab waterfall will feel like two furniture items that ended up in the same room by accident.
Key Takeaway: Choose white quartz with a light, quiet vein at 1.25-inch (3.2-cm) thickness for the most forgiving all-conditions countertop in a Scandinavian kitchen.

Step 5: Choose Hardware That Disappears Into the Design
 Save
Hardware is where most people either overspend on the wrong thing or underspend and end up with something that makes a beautiful cabinet look like a hardware store return. In a Scandinavian kitchen, the job of hardware is to add one material note without competing with the wood or the countertop.
The two finishes that work reliably are brushed brass and matte black. Polished chrome and satin nickel are not wrong, but they carry a mid-2010s modern kitchen association that makes a Scandinavian kitchen read as slightly dated. Brushed brass brings warmth and reads as a craft finish rather than a commercial one. Matte black is colder but works well when the palette runs cooler (a white oak with more gray tones, for example) or when you want a moment of graphic contrast.
Bar pulls are the most consistent performer. A 5-inch (12.7-cm) or 6.3-inch (16-cm) bar pull on drawer fronts and a 3.75-inch (9.5-cm) pull on cabinet doors is a clean, proportional ratio that reads as intentional. Cup pulls (the small C-shaped hardware most associated with farmhouse kitchens) pull the style away from Scandinavian and toward cottage, unless used very sparingly on a single accent cabinet.
The high-end move in Scandinavian kitchens right now is a combination approach: routed integrated handle channels on upper cabinets for a fully flat upper section, combined with brass bar pulls on lower drawers and base cabinets. This combination creates a visual calm in the upper section of the kitchen (where most of the visual weight is) while adding warmth through material at counter level, which is where the eye spends the most time.
The failure mode is over-specifying hardware as a design moment. If the hardware is the first thing a guest notices, it is doing too much. In a Scandinavian kitchen, the wood should be the first thing they register. The hardware should be the second.
Key Takeaway: Use brushed brass bar pulls at 5-inch (12.7-cm) to 6.3-inch (16-cm) centers on lower cabinets, and consider integrated routed channels on upper cabinets to keep the upper wall visually calm.

Step 6: Plan Your Sink and Tap as a Unit, Not Separately
 Save
The sink-and-tap decision seems like a small one until you realize it is the single most-viewed object in a kitchen. You stand at it multiple times a day. So does everyone else who visits. It is worth treating it as a design decision rather than a functional afterthought.
In a Scandinavian kitchen, two sink configurations work. The first is an apron-front (also called farmhouse) sink in white fireclay or stainless steel. The fireclay version, particularly in pure white with a flat front face (not a fluted or ornamental face), brings a quiet craft quality that pairs well with oak cabinetry and warm hardware. It is a substantial piece, and it reads as intentional in a way that a drop-in or undermount sink at the same size does not. The failure mode here is a fireclay sink with a cream or off-white body. Unless your countertop is exactly the same temperature, the sink will look slightly dirty beside a pure white countertop, or the countertop will look cold beside a warm cream sink.
The second configuration is an undermount stainless steel sink in a 16-gauge single-bowl format. The 30-by-18-inch (76-by-46-cm) or 32-by-19-inch (81-by-48-cm) single-bowl accommodates large pots without the center divider interrupting the workflow. Gauge matters: 16-gauge (1.5mm thick) is the practical minimum for a sink that will not drum or flex. Anything labeled 18-gauge or thinner is a cost cut that you will hear every time a pot lands in the basin.
For the tap, the finish should match your cabinet hardware finish exactly. A brushed brass tap with chrome bar pulls is a mistake made in about 40 percent of the kitchens that end up on “something feels off” threads on Reddit. The finish unification rule is not optional in a Scandinavian kitchen. The whole point of the style is that every element points in the same direction. One rogue finish breaks the logic of the whole room.
Key Takeaway: Match your tap finish to your cabinet hardware finish exactly, and treat the sink-and-tap combination as a single purchase decision made at the same time.

Step 7: Design the Backsplash to Recede, Not Compete
 Save
The backsplash is the element most likely to be overdone in a kitchen that is trying to be Scandinavian. The instinct to make the backsplash a feature is understandable. It is a large, visible surface. But in a Scandinavian kitchen, the backsplash’s job is to hold the wall together without pulling attention away from the wood and the countertop.
The most successful Scandinavian backsplashes share one characteristic: they are low-contrast relative to the wall and countertop. A backsplash in the same tonal family as the wall (warm white on warm white, pale gray on pale gray) will create a seamless plane that makes the kitchen feel wider and taller. A backsplash in a contrasting color or a strong graphic pattern does the opposite: it chops the wall into zones and compresses the vertical space.
Large-format tiles in 12-by-24-inch (30-by-61-cm) or 24-by-24-inch (61-by-61-cm) in a matte or honed ceramic are the practical ideal. Fewer grout lines means less visual texture on the plane, which keeps the wall clean. Specify unsanded grout in a color matched to the tile body (not a darker charcoal, which creates a grid pattern that fights the seamless effect).
Subway tile works in a Scandinavian kitchen only in a specific format: a traditional 3-by-6-inch (7.6-by-15.2-cm) subway in a flat, non-beveled profile, laid in a simple horizontal stacked bond (not herringbone). Herringbone subway tile is not wrong by itself. It simply introduces a level of visual activity that most Scandinavian kitchens cannot absorb without the rest of the room feeling busy.
The exception is a stone-slab backsplash: a continuous piece of the same material as the countertop running floor to the underside of the upper cabinets. This full-height approach is the most architecturally complete option and the one most often seen in high-end Nordic kitchens. A full-height backsplash keeps the look seamless by eliminating the visual stop at countertop level. The budget premium is real, but the effect is proportionally greater.
Key Takeaway: Choose a large-format matte tile in the same tonal family as your walls, with grout matched to the tile body, so the backsplash reads as a continuous surface rather than a pattern.

Step 8: Choose Your Flooring and Run It Consistently
 Save
Flooring in a Scandinavian kitchen operates the same way as the backsplash: its job is to unify, not to feature. The most common mistake is selecting a flooring material in isolation from the cabinetry, then discovering the tones fight each other once both are installed.
Keep finishes matte rather than glossy. Oak in any of its tones, from pale to natural to dark, anchors the palette. Wide-plank pale or honey oak hardwood in a matte lacquer or oil finish is the Scandinavian flooring standard. Plank width matters: 5-inch (12.7-cm) planks are the minimum for a floor that reads as Scandinavian rather than builder-grade. Seven-inch (17.8-cm) or wider planks, sometimes called “extra-wide plank,” create a slower, more grounded visual rhythm that suits a kitchen built around material quality.
If solid hardwood is outside the budget, engineered hardwood with a genuine oak veneer of 3mm or more is a workable alternative. The veneer thickness determines whether the floor can be refinished: anything under 2mm cannot be sanded without going through to the core. In a kitchen where water and spills are routine, a pre-finished engineered oak with a factory UV-oil finish will outperform an unfinished site-oiled plank because the factory finish has uniform penetration depth.
You've saved it, wanted it. Here's the how: codes, measurements, order. Your choices make it yours.

Tile is the other legitimate option. Large-format porcelain in a warm stone or concrete look (24-by-24-inch (61-by-61-cm) minimum) with a matte or honed finish reads appropriately Scandinavian. The grout must be narrow and the grout color must match the tile closely. Wide grout joints in a contrasting shade convert a Scandinavian kitchen into something that looks assembled from a big-box store sample.
Consistent flooring also makes the entire area feel larger and more seamless, which is why the most important rule here is to run the same flooring material from the kitchen into any adjoining open-plan space. A flooring transition strip between the kitchen and the living or dining area is a hard stop for the eye and breaks the spatial flow that Scandinavian open-plan layouts depend on.
Key Takeaway: Specify wide-plank oak at 5 inches (12.7 cm) or wider in a matte finish, and run it continuously from the kitchen into any connected living space without a transition strip.

Step 9: Layer Your Lighting in Three Distinct Levels
 Save
Lighting is where most Scandinavian kitchens fall short, not because the fixtures are wrong but because there is only one source. A single ceiling fixture is functional. It is not a Scandinavian kitchen. Today, homeowners are leaning heavily into layered lighting and cozy textures within Nordic interiors. Layering means three distinct levels of light source, each doing a different job.
The first level is ambient: a ceiling-mounted fixture that provides overall fill light without creating harsh shadows. In a Scandinavian kitchen this is almost always flush-mount or semi-flush, in matte white, brushed brass, or matte black. Recessed can lights work technically but tend to read as office or commercial rather than residential and warm, particularly in ceilings under 9 feet (2.7 m).
The second level is task lighting: under-cabinet LED strips mounted at the back of the upper cabinet underside, positioned to throw light forward onto the countertop rather than into the backsplash. The color temperature for task lighting in a Scandinavian kitchen should be 2700K, not 3000K or above. 2700K reads as candlelight-warm and integrates visually with natural daylight during the day. 3000K starts to look clinical by comparison. Get this wrong and the kitchen will feel like a dentist’s office after dark, which is the exact opposite of hygge.
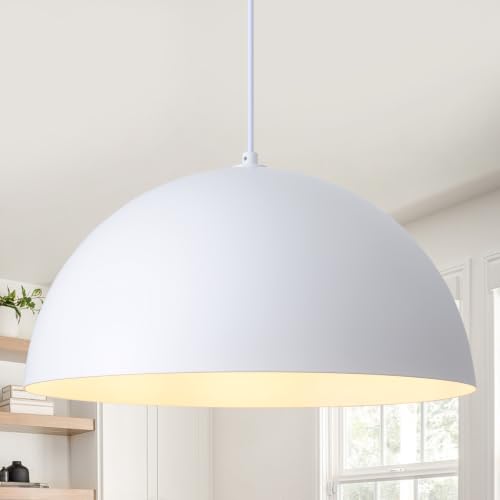
The third level is decorative: one or two pendant fixtures over an island or a breakfast bar. Pendant height is the most frequently miscalculated dimension in kitchen design. The bottom of the pendant should hang 28-to-32 inches (71-to-81 cm) above the countertop surface for a 9-foot (2.7-m) ceiling. Drop that to 24-26 inches (61-66 cm) and the pendants obscure sightlines across the island. Raise them above 34 inches (86 cm) and they lose their focal presence and look like they belong in a hallway instead of a kitchen.
Matte white dome pendants, rattan or woven pendants, and simple cylindrical shades in linen are all correct material choices for a Scandinavian kitchen. Glass pendants in clear or smoked tones can work if the rest of the room is very restrained. Industrial-style cage pendants are not Scandinavian: they belong to a different aesthetic entirely and will undermine the warmth you have built in every prior step.
Key Takeaway: Install three levels of light, ambient flush-mount, under-cabinet LED at 2700K, and decorative pendants at 28-to-32 inches (71-to-81 cm) above the counter, and never rely on a single ceiling source.
Step 10: Add Open Shelving Without Overcrowding It
 Save
Open shelving is one of the most Pinterest-saved elements of a Scandinavian kitchen and one of the most mishandled. The issue is not the shelves. It is what people put on them.
The biggest mistake is overcrowding the shelves. Scandinavian design focuses on restraint. A few curated objects always look better than shelves packed with random decor. The Scandinavian shelf is not a storage unit. It is a display of material relationships: ceramic against wood, green against white, matte against matte.
Shelf specification matters before you get to the styling. A floating oak shelf should be a minimum of 1.5 inches (3.8 cm) thick. Anything thinner deflects slightly under the weight of ceramics and looks provisional rather than architectural. Shelf depth for a kitchen context should be 10-to-12 inches (25.4-to-30.5 cm). This is enough for a dinner plate standing upright (10 inches/25.4 cm in diameter) without protruding into the room. Deeper shelves (14 inches/35.6 cm) work in a pantry context but read as countertop-adjacent furniture in a kitchen and collect dust at the back.
Shelf placement follows a clear logic. The first shelf should mount 18 inches (45.7 cm) above the countertop (at approximately the same height as an upper cabinet’s bottom rail). The second shelf, if present, mounts 12-to-14 inches (30.5-to-35.6 cm) above the first. This spacing lets you stand objects upright and place taller items (a ceramic pitcher, a small plant) on the lower shelf without them blocking the shelf above.
The styling rule that makes open shelves look designed rather than random: use a maximum of four object categories per shelf. Plates, bowls, books, and one plant is a complete shelf. Adding a fifth category (a candle holder, a small framed card, a spice jar) is when a shelf stops reading as curated and starts reading as accumulated. Take things off until it feels slightly too spare. That is usually right.
Key Takeaway: Hang open shelves at 1.5-inch (3.8-cm) minimum thickness, 18 inches (45.7 cm) above the counter, and style each with no more than four object categories.

Step 11: Integrate Appliances So They Disappear
 Save
Appliances are the single biggest disruptor of visual calm in a Scandinavian kitchen when handled incorrectly. A stainless steel refrigerator standing as a freestanding object against an oak cabinet wall is exactly the kind of hard stop that a Scandinavian kitchen is designed to avoid.
Panel-ready appliances, specifically panel-ready refrigerators and dishwashers, are the correct approach for a fully integrated Scandinavian kitchen. A panel-ready fridge takes a cabinet door panel on its face, making it read as another cabinet in the run. The result is that the refrigerator disappears into the room rather than announcing itself. This is not a small aesthetic difference. In a kitchen where the cabinetry run is the main visual element, a freestanding fridge in contrasting stainless creates a break in the composition that no amount of styling can fully resolve.
For the range and oven, stainless steel is acceptable because the range occupies a dedicated alcove and the cooking zone already has a visual anchor role. The key is the range hood. A custom hood in painted wood to match the upper cabinets (a “box hood” rather than a decorative sculpted hood) keeps the hood from becoming a feature. An ornate carved or hammered metal hood is a farmhouse or French country decision. In a Scandinavian kitchen, the hood should read as architecture, not furniture.
If panel-ready refrigerators are outside the project budget, a refrigerator in a solid flat color (matte white or matte black, not brushed stainless) is the next-best option. Matte white refrigerators exist from a handful of manufacturers and blend into a white Scandinavian kitchen reasonably well when positioned in a corner rather than anchoring a primary run.
Countertop appliances present the same logic at a smaller scale. A KitchenAid in cobalt blue, a bright red espresso machine, a graphic toaster: every appliance left on the counter that is not in the kitchen’s palette is a material interruption. Store what you do not use every day. Keep what you use daily behind an appliance garage door or inside a deep lower cabinet with roll-out trays.
Key Takeaway: Specify panel-ready fronts for the refrigerator and dishwasher, and store any countertop appliance not in the kitchen’s color palette inside a cabinet or appliance garage.

Step 12: Add Textural Layers Through Textiles and Organics
 Save
Textural layering is the last step, and it is the one that separates a Scandinavian kitchen that looks styled from one that just looks designed. A room with perfect cabinetry, hardware, and lighting but no soft material layer feels like a showroom. Textiles and organic elements are how you introduce the warmth that photographs well but, more importantly, makes the room feel right to be in.
The textile layer in a Scandinavian kitchen is small in scale but specific in material. Linen is the correct fabric: natural linen hand towels, linen placemats, a linen runner across the island surface. Linen reads as a natural material with the same organic quality as the wood. Cotton is softer and more domestic. Microfiber is wrong. Combine clay, beige, and sand with tactile textures: wood, natural stone, woven linen. The color of the textiles should stay within the palette established in Step 1. Oatmeal, warm white, natural undyed linen, and the occasional muted sage or dusty terracotta work. A bright kitchen towel in a graphic pattern from a grocery store will undermine everything that surrounds it.
Organic elements in a Scandinavian kitchen are not decorative in the traditional sense. They are material relationships. A terracotta pot with a trailing herb (rosemary, thyme, or a small-leafed basil) placed beside the sink introduces three things: a natural material in the pot, a living green element, and a tactile contrast to the smooth quartz and matte cabinet surface behind it. A ceramic bowl holding seasonal produce (three lemons, a handful of small apples) does the same at the island scale.
Hand-finished joints, paper cord, and oiled wood all function as a counter-statement to machine-perfect surfaces. In practical kitchen terms, this means a woven seagrass basket on the lower open shelf instead of a stack of plastic bins, a wooden cutting board leaning against the backsplash beside the range instead of a plastic one propped in a drawer. Each choice is small. The accumulation is a room that reads as intentional and handcrafted rather than digitally assembled.
The failure mode here is treating the styling layer as secondary. After spending the project budget on cabinetry and countertops, the instinct is to skip the final 2 percent: the towels, the ceramics, the herb pot. That 2 percent is what makes someone save the photo.
Key Takeaway: Use natural linen textiles in oatmeal or warm white, one potted herb, and one organic basket or bowl per counter zone, and treat every surface prop as a material decision, not an afterthought.

Step 13: Get the Island Proportions Right Before Ordering
 Save
An island makes a Scandinavian kitchen. A wrong-sized island makes a Scandinavian kitchen unusable. The proportion and clearance decisions for an island need to be resolved before the cabinetry order is placed, because changing them afterward means starting over.
The minimum clearance between the island and any fixed cabinet run is 42 inches (106.7 cm). This is the distance measured from the island’s cabinet face to the opposing cabinet’s face. 42 inches is the one-person working clearance. If two people cook simultaneously, 48 inches (121.9 cm) is the minimum before the kitchen starts to function comfortably. Below 42 inches, the kitchen passes code in most jurisdictions but fails the daily use test: you cannot open the oven door and stand at the island simultaneously.
Island length is proportional to the kitchen’s length. In a kitchen shorter than 14 feet (4.3 m), an island longer than 54 inches (137.2 cm) will dominate the space and compress the ends. In a kitchen of 15-to-18 feet (4.6-to-5.5 m), a 72-to-84-inch (182.9-to-213.4-cm) island is the correct range. An island that is too short for the kitchen length looks like a chopping block placed in a room rather than a piece of furniture that belongs there.
Overhang for seating is a separate dimension. A standard kitchen counter is 36 inches (91.4 cm) high. For seating on standard counter-height stools (24-to-26-inch (61-to-66-cm) seat height), the overhang needs to be at least 12 inches (30.5 cm) to allow a comfortable seating position with legs cleared under the counter. Less than 12 inches and your guests sit at an awkward angle. In Scandinavian kitchens, the cleaner aesthetic choice is to keep the island the same height as the perimeter counters (36 inches/91.4 cm) rather than raising one end to bar height (42 inches/106.7 cm), which introduces two different sightlines in the same room and complicates the visual calm you have built.
Key Takeaway: Set island-to-cabinet clearance at a minimum of 42 inches (106.7 cm), keep the overhang at 12 inches (30.5 cm) or more for seating, and match the island height to perimeter counter height for visual cohesion.

When every step in this sequence is resolved in order, the result is not a kitchen that looks Scandinavian in photographs. It is a kitchen that functions and feels Scandinavian every day: calm when it is empty, warmer when it is in use, and specific in a way that no amount of mood-boarding achieves without a clear build sequence behind it. The two decisions that have the most downstream impact are the palette (Step 1) and the wood species and finish (Step 2). Get those two right, and every subsequent choice has a reference point. Get them wrong, and every subsequent choice becomes a negotiation. Start with the palette on the wall, live with it for 48 hours, then lock the wood. Everything else follows.
You've saved it, wanted it. Here's the how: codes, measurements, order. Your choices make it yours.
 Save


