 Georgia
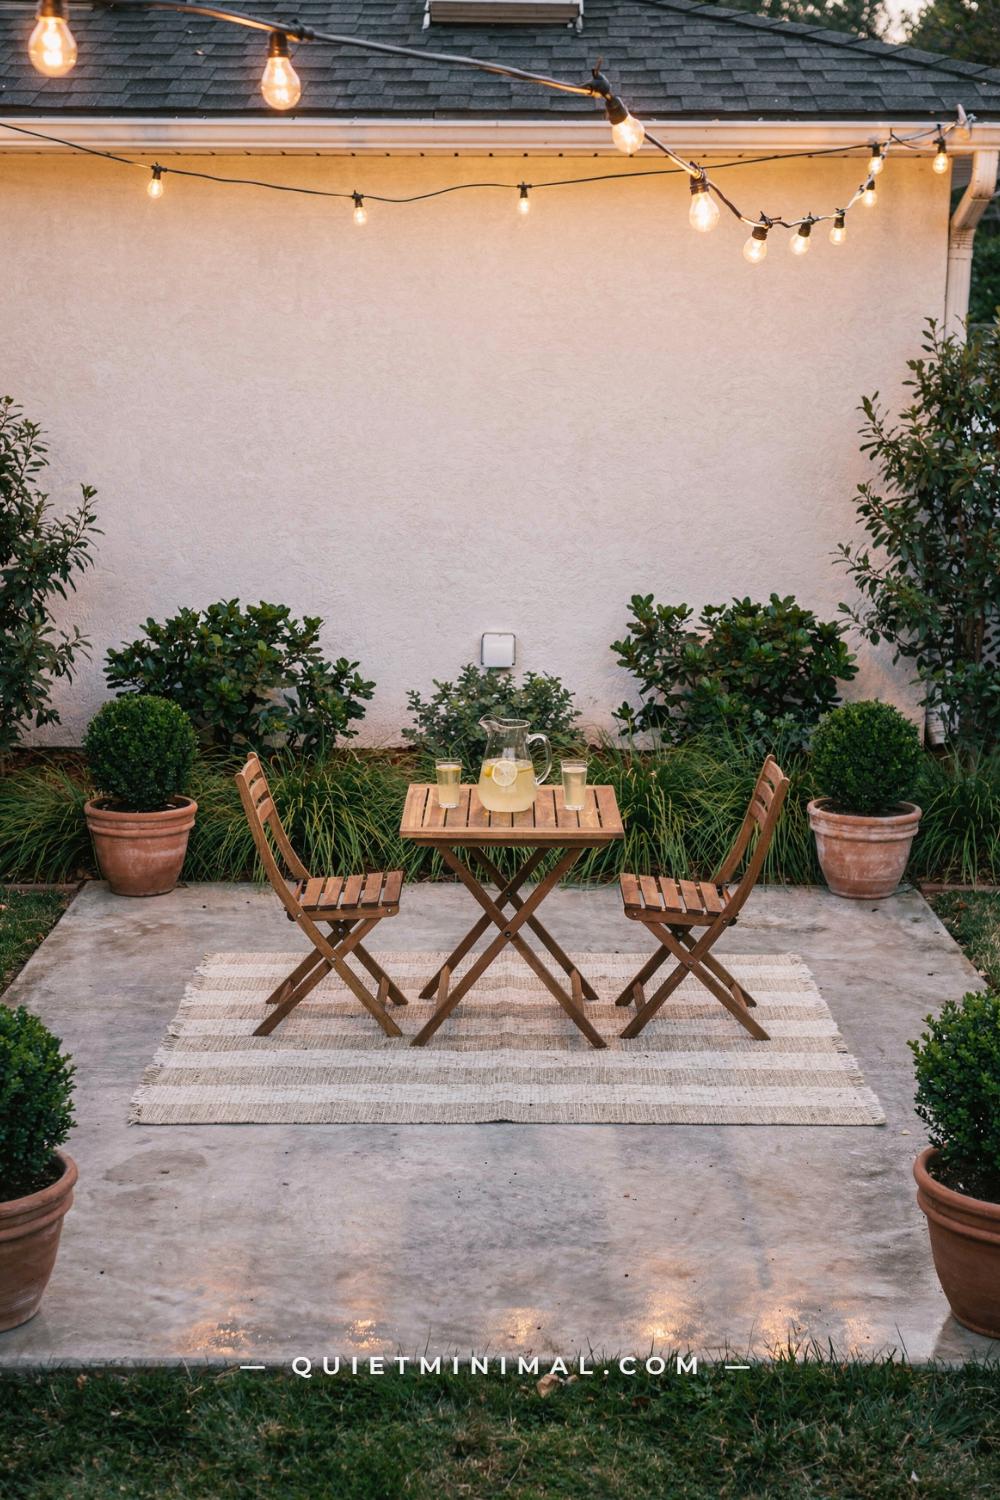
The question is a plain one: what can you actually do with a small concrete patio for under $500? You have a poured slab off the back door, somewhere between 8 x 8 ft (2.4 x 2.4 m) and 10 x 12 ft (3 x 3.7 m), grey, a little pitted, with a hairline crack you have stopped noticing. Tearing it out and pouring something new runs $6 to $20 per sq ft, which on 120 sq ft (11 sq m) is $720 to $2,400 before a single chair arrives. Small concrete patio ideas on a budget start from a better place than that: the floor already exists, it drains, it is level enough, and every dollar you have can go to how it looks and how it gets used.
The answer has a definite shape. First you find out what the slab will accept, with three tests that cost nothing. Then you clean it, which is the only step that cannot be skipped. Then you choose one floor finish by its cost per square foot on your actual footage, and only then do you spend on the rug, the seats, the edge planting and the light, in that order. Each section below is one facet of that answer, with the numbers attached, and the last one states the plan in a single sentence you can take to the hardware store.
Start With the Slab You Have: Why the Concrete Is the Budget’s Best Friend
 Save
The most expensive part of any patio is the part you cannot see once it is finished: the excavation, the compacted base, the edge restraint, the concrete or the pavers, the labour to set them. A new poured slab costs $6 to $20 per sq ft in 2026 pricing, and a paver floor with its gravel and sand base is $5 to $10 per sq ft even when you lay it yourself. Your slab has already paid that bill. On a 10 x 12 ft (3 x 3.7 m) patio that is somewhere between $720 and $2,400 of value sitting under your feet, and the whole logic of a $500 budget is to keep it there.
That changes what the money is for. You are not buying a floor. You are buying the difference between a grey rectangle and an outdoor room, and that difference is made of four things: the tone of the surface, something soft on it, something to sit on, and a green edge that stops the concrete reading as a driveway. Every one of those is cheap in the way structure is not. A gallon of stain, a rug, two folding chairs and six 1 gal shrubs come in under the budget with room left for lights, and the slab’s own flatness and drainage make each of them work.
The trap is treating the slab as a problem to hide. Covering the whole thing in deck tiles or a rug big enough to swallow it spends the budget on disguise and leaves nothing for the parts that make the patio usable. Think of the concrete as the floor of a room you are furnishing, not a stain you are covering, and the question becomes easy: which finish suits this slab, and what goes on it first. Those are the questions the next sections answer, starting with three tests that tell you what the concrete will take.
From the guides
You've saved it, wanted it. Here's the how: codes, measurements, order. Your choices make it yours.
 The Japandi Honest PlaybookThe honest version of the style: what to keep, what to skip, and the order to do it in.See inside →
 The Room Refresh PlaybookA repeatable four-step method, room by room, in ten minutes, thirty minutes, or one weekend.See inside →
 Make Any Room Feel Cozy on PurposeWhy some rooms hold people and others empty out, and the moves that change it.See inside →
Key Takeaway: The slab has already paid the $6 to $20 per sq ft that a new floor would cost, so the whole $500 goes to finish, softness, seating and edge planting rather than to hiding it.
The Three Tests That Decide What the Slab Will Accept
 Save
Before you buy anything, the slab has to tell you three things, and it tells you all three for free. The first is whether it will absorb a finish at all. Pour a cup of water on the concrete in three or four places and watch it. If the water darkens the surface and soaks in within five minutes, the slab is open and a stain will take. If it beads and sits there, something is sealing the surface, either an old coating, a curing compound left from the pour, or a hard-trowelled cap, and any stain or paint you put over it will lie on top and peel. That slab needs etching or stripping first, and if you skip the test you find out the expensive way.
The second test is moisture from below. Tape a 2 ft (61 cm) square of clear plastic sheet to the slab in the evening, all four edges sealed, and lift it the next morning. Droplets on the underside or a dark patch on the concrete mean water vapour is rising through the slab, which is common on patios poured straight on soil with no barrier. A stain, which soaks in, tolerates that. A film-forming paint does not, and blistering paint on a damp slab is the single most common patio regret you will find in any forum. The plastic square decides stain versus paint before the colour chart ever comes out.
The third is the condition test, and it is a walk with a straightedge and a tape. Note every crack and measure its width: hairlines under 1/8 in (3 mm) are cosmetic; anything wider wants a sealant; a crack where one side sits higher than the other is a heave, and no finish fixes that. Count the pits and spalled patches, and lay a 4 ft (122 cm) level across the slab in both directions to see how far the surface has dished. Small pitting takes a resurfacer; a slab that holds water in a low centre wants the resurfacer troweled to a fall. Write the three answers down. The finish sections below are each keyed to them, and the one the slab passes is the one you spend on.
Key Takeaway: Run the water test, the overnight plastic test and the crack-and-level walk before buying anything, because those three answers decide whether the slab gets stain, paint, resurfacer or a cover-up.
Cleaning Is the First $50 and the One You Cannot Skip
 Save
Every finish in this article, from a $37 gallon of stain to a $12 string of lights, sits better on a clean slab, and the two finishes that go on the concrete itself will fail outright on a dirty one. Oil, algae, mildew, pollen film and the fine dust that concrete sheds all sit between the surface and whatever you apply, and the first season’s weather lifts the finish off with the dirt still attached underneath. Cleaning is the unglamorous $50 that protects the other $450.
The efficient way is a rented pressure washer. Home Depot rents an electric unit for about $47 a day and a gas unit for about $87, and a 120 sq ft (11 sq m) slab is a two-hour job with either. Work in overlapping passes with the wand at a consistent height, about 12 in (30 cm) off the surface, and keep it moving; a wand held still at 3,000 psi will etch a pale scar into the concrete that shows through a semi-transparent stain forever. For oil spots, a concrete degreaser at about $22 a gallon goes on first, dwells for ten minutes, and gets scrubbed with a stiff brush before the washer takes it off. Where the water test beaded, the cleaner-and-etcher at $23.97 a gallon opens the surface in the same pass.
If renting is not possible, the slow route still works: a gallon of degreaser, a deck brush with stiff bristles, and a garden hose with a jet nozzle, in three sessions rather than one. What matters is the result, not the tool. Rinse until the runoff is clear, then let the slab dry for a full 24 hours in dry weather before anything goes on it. Concrete that looks dry can still hold water an inch down, and stain applied to a damp slab goes blotchy in exactly the pattern of the damp. The cleaning day and the finishing day are two different days, and treating them as one is how weekend projects turn into do-overs.
Key Takeaway: Rent an electric pressure washer for about $47, degrease the oil spots first, keep the wand moving, and give the slab a full dry day before any finish, because dirt under a coating is the reason coatings peel.
What $500 Buys, Per Square Foot: The Cost Ladder for a 10 x 12 ft (3 x 3.7 m) Slab
 Save
Take a 10 x 12 ft (3 x 3.7 m) slab, 120 sq ft (11 sq m), as the working example, because it is the size most small patios land near and it makes the arithmetic honest. Every option below is priced on that footage from live 2026 retail listings, and the per-square-foot number is the one to carry with you to your own slab.
Cleaning comes first at roughly $70: a $47 electric washer rental plus a gallon of degreaser at about $22, or the etcher at $23.97 where the slab needs opening. Stain and seal is the cheapest true finish: a gallon of semi-transparent concrete stain at $36.98 covers 250 to 500 sq ft rolled, so one gallon does the slab with a second coat to spare, and a gallon of sealer at $38.98 covers up to 400 sq ft. With a $20 pump sprayer that is about $100, or 80 cents per sq ft, which matches the under-$1 figure the stain suppliers quote for DIY. A stencil layer on top adds a $55 to $61 mylar stencil, a quart of contrasting stain and a water-based polyurethane, roughly $100 more, so a stencilled floor lands near $200 or $1.65 per sq ft.
Deck tiles are the big-ticket floor. Acacia snap-together tiles at $34.99 per 8.7 sq ft pack are about $4 per sq ft, so covering the full 120 sq ft takes 14 packs and $490, the entire budget. The brown-stained version at $2.87 per sq ft brings that to $362. Composite tiles at $7 to $15 per sq ft are out of reach for the whole slab at $840 and up, which is why the smart move with tiles is a zone, not a field: an 8 x 8 ft (2.4 x 2.4 m) seating square is 64 sq ft, 8 packs and $280 in acacia before a ninth pack for cuts. A resurfacer for a pitted slab costs $18 to $30 per 40 lb bag at 40 sq ft per bag, so three bags and $54 to $90 renew the whole surface. The rug is a fixed $100 to $150 for a 5 x 7 ft (152 x 213 cm) or 6 x 9 ft (183 x 274 cm) outdoor flatweave, and the pad is $15. Lay those numbers side by side and the ladder writes itself: stain and seal leaves $400 for everything else; a tiled zone leaves $220; tiling the whole slab leaves nothing.
Key Takeaway: On 120 sq ft, stain and seal costs about 80 cents per sq ft, a stencilled floor about $1.65, acacia deck tiles about $4 and composite $7 to $15, so the finish you choose decides whether $400 or $0 is left for the rug, seats and plants.
Semi-Transparent Stain: The Under-$1-per-Square-Foot Change That Reads as Bought
 Save
If the water test soaked in and the plastic test came up dry or nearly so, semi-transparent stain is the finish that gives the most change for the least money, and it is the one the 2026 trend reporting keeps naming for outdoor concrete. It works by soaking into the top of the slab and tinting it rather than coating it, so the mottling and the broom texture of the concrete still show, and the result reads as a material rather than a painted floor. Behr’s semi-transparent concrete stain is $36.98 a gallon and covers 250 to 500 sq ft rolled, which means a single gallon does a 120 sq ft (11 sq m) slab twice, with an accent pass to spare for depth.
The application is a pump sprayer, a roller or a brush, and the technique is the whole result. Thin coats, kept wet at the edge so no lap line dries in, working across the slab in one direction and back in the other for the second pass. A semi-transparent stain gets darker with each coat, so the first coat is the colour test and the second is the decision. On a small slab it is worth spraying the first coat from the far edge toward the door, so you never walk on wet stain, and checking the colour after it has dried for an hour rather than while it is wet and dark. The dry colour is always two shades lighter than the wet one.
Colour is where restraint pays. Warm greys, soft taupes and pale sand tones read as stone; anything with strong colour reads as paint even when it is stain. The right test is the house wall: a stain one or two shades darker than the wall colour makes the slab read as the ground plane of the same room, and a stain that fights the wall makes the patio look added. Leave the stained slab 24 hours before the sealer, apply the sealer at $38.98 a gallon in two thin coats, and give the whole thing a day before the rug comes out. Under $1 per sq ft, one weekend, and the grey rectangle becomes a floor.
Key Takeaway: On an open, dry slab, a $36.98 gallon of semi-transparent stain in a warm grey or taupe, sprayed thin in two coats and sealed a day later, is the finish that gives the most change per dollar.
Stain or Paint: Why the Slab Decides and Not the Colour Chart
 Save
The question people type is “stain or paint”, and the honest answer is that the slab has already chosen. Stain soaks in; paint sits on top. That one difference decides everything that follows, and the two tests from earlier are how the slab tells you which way it goes. If the water soaks in and the plastic comes up dry, either will hold, and stain is cheaper and ages better. If the water soaks in but the plastic shows moisture, stain only. If the water beads, neither goes on until the surface is etched or stripped.
Paint has real advantages on the right slab. A solid-colour porch and patio paint gives a uniform, opaque finish that hides discolouration, old repairs and the patchwork of a slab poured in two visits. It comes in every colour the wall does, and a textured anti-slip version adds grip on a smooth trowelled surface. The cost is similar to stain per gallon, and a gallon covers about the same area. The disadvantage is structural: a film that sits on the surface is a film that can be lifted off it. Moisture vapour rising from a slab with no barrier pushes against the paint from below and blisters it; sun and freeze-thaw work at the edges; a chair leg dragged across it scratches through to grey. Failed patio paint is the most photographed patio regret online, and nearly every case traces to one of three causes: a damp slab, a hard-trowelled or previously sealed surface, or dirt left under the coating.
Stain loses on coverage and wins on everything else. It will not hide a repair; it tints the patch and the original differently, which is why a resurfaced slab wants a solid finish. But it cannot peel, because there is no film to peel. It wears by fading, not flaking, and fading can be refreshed with a coat rather than stripped. For a small patio under $500 the rule is simple: stain by default, paint only where the slab is dry, open and so patchy that opacity is the point. Either way, the sealer on top is what makes the finish last, and the maintenance calendar later in this article shows how often each one needs it.
Key Takeaway: Stain soaks in and cannot peel, paint sits on top and hides more, so choose stain unless the slab is both dry and so patched that you need opacity, and never paint a slab that failed the plastic test.
The Stencil Weekend: A Tile Look for the Price of One Mylar Sheet
 Save
A stencilled slab is the budget answer to encaustic cement tile, and on a small patio it costs less than a single box of the real thing. The stencil itself is $54.95 to $60.95 from the specialist makers, laser-cut from 10 mil mylar that lies flat and washes clean between repeats, in tile-scale repeats of about 12 to 24 in (30 to 61 cm). Add a quart of contrasting solid stain for the pattern and a water-based polyurethane to protect it and the stencil layer is around $100 on top of the base finish. For the 120 sq ft (11 sq m) example that puts the whole floor near $200, about $1.65 per sq ft, for a surface that photographs like something four times the price.
The base coat decides whether it works. A stencil wants an opaque, even ground, which means a solid-colour concrete stain or a porch and patio paint rather than a semi-transparent one, so a stencil belongs on a slab that passed both tests. Pale base, mid-tone pattern is the combination that reads as tile; a dark base with a pale pattern reads as a painted floor and shows every wear mark. Keep the contrast moderate, two or three steps apart on the same colour card, and the pattern reads as material rather than decoration.
Technique is patience rather than skill. Snap a chalk line across the centre of the slab in both directions and start the first repeat at the crossing, working outward so the cut repeats land at the edges where a rug or a planter will sit. Use a dense foam roller loaded lightly and rolled off on paper before it touches the stencil; nearly every bleed under a stencil comes from too much paint, not from the stencil moving. Lift straight up, wipe the back every third repeat, and let each repeat flash off for a few minutes before the stencil overlaps it. Two thin coats of water-based polyurethane over the finished pattern, never oil-based, which yellows a cream base in one summer, and the floor is ready for furniture after 48 hours.
Key Takeaway: A $55 to $61 mylar stencil over an opaque pale base, rolled with a nearly dry foam roller from a centre chalk line and sealed with water-based polyurethane, gives a tile floor for about $1.65 per sq ft.
The Stencil Order, Hour by Hour
 Save
A stencilled patio is a three-day job with most of the hours spent waiting, and the order matters more than the speed. Day one is cleaning: pressure wash or scrub, degrease the spots, rinse until clear, and stop. The slab needs a full 24 dry hours, because an opaque base coat traps whatever moisture is beneath it and shows it as blisters within the month. Day two, morning: run the water test once more on the dry slab to confirm the surface is open, then apply the base coat, a solid-colour concrete stain or porch and patio paint, in two thin coats four hours apart, rolled from the far edge toward the door. Day two, evening: nothing. The base wants overnight to cure before it takes a stencil.
Day three is the pattern, and it runs in a fixed sequence. Hour one: snap two chalk lines through the centre of the slab, one each way, and dry-fit the stencil at the crossing to check how the repeats will land at the edges; shift the centre by half a repeat if a sliver would fall along the most visible edge. Hours two to five: stencil outward from the centre in rows, loading the foam roller lightly, rolling off on paper, lifting straight up, wiping the underside every third repeat. A 120 sq ft (11 sq m) slab with a 24 in (61 cm) repeat is 30 repeats, about ten minutes each with the wiping, so budget five hours with breaks. Hour six: touch up bleeds with a small artist’s brush and the base colour, and let the whole pattern dry for four hours.
Day three, evening or day four, morning: first coat of water-based polyurethane, rolled thin, and a second coat four hours later. Foot traffic after 24 hours, furniture after 48, rug after a week so the sealer has fully hardened before it is covered. Written down, the order is clean, dry, base, cure, chalk, stencil, touch up, seal, wait. Skip any waiting step and the floor tells on you by the end of the first season.
Key Takeaway: Clean on day one, base coat on day two, stencil from a centre chalk line and seal on day three, and give the finished floor 48 hours before furniture and a week before the rug.
Snap-Together Deck Tiles: The Floor You Take With You
 Save
Snap-together deck tiles are the answer for the slab you cannot stain: the rental patio, the slab that beaded on the water test and that you are not going to etch, the slab that is sound but ugly in a way no tint would fix. They are 11 3/4 in (30 cm) squares of acacia or composite slats on a plastic grid that clips to its neighbours, and they lay dry over the concrete with no glue, no screws and nothing that a landlord could object to. IKEA’s acacia version is $34.99 for a pack of nine covering 8.7 sq ft (0.81 sq m), which works out to about $4 per sq ft, and the brown-stained version is about $2.87 per sq ft. Composite tiles from the home centres run $7 to $15 per sq ft and last longer in full sun.
The grid underneath is the part that makes them work on a slab. It lifts the wood about 3/4 in (2 cm) off the concrete, so rain drains through and the slab dries beneath, and it forgives a slab that is a little uneven or a little pitted. The two things it does not forgive are standing water and a slab that slopes toward the house. If the concrete holds a puddle in the centre, the tiles above it stay damp and the acacia greys and softens in a season; fix the low spot with a resurfacer first, or leave that zone bare. Check the slope with the level from the tests section, and if the fall runs toward the wall, the tiles will trap water against the house.
Lay them from the corner the eye sees first, usually the corner nearest the door, and work outward so the cut tiles land along the least visible edge. Alternate the slat direction tile by tile for a checkerboard, or run them all one way to make a narrow slab look longer. Leave a 1/2 in (13 mm) gap at any wall for expansion, and stop the tiles 2 in (5 cm) short of the slab’s open edge so the concrete shows as a clean border rather than the plastic grid. On a full 120 sq ft (11 sq m) slab the acacia tiles alone are $490, the entire budget. On an 8 x 8 ft (2.4 x 2.4 m) seating zone they are about $280 before cuts and the rest of the slab stays concrete, which is the version that leaves money for a place to sit.
Key Takeaway: Acacia snap-together tiles at about $4 per sq ft give a renter-safe wood floor that drains through its grid, but on 120 sq ft they consume the whole budget, so tile the seating zone and leave the rest bare.
Deck Tiles by the Numbers: Packs, Cuts and the Border You Leave
 Save
Deck tiles are sold by the pack and laid by the square foot, and the gap between those two numbers is where budgets slip. A pack of nine 11 3/4 in (30 cm) tiles covers 8.7 sq ft (0.81 sq m), not 9, and cuts at the edges waste part of every tile that meets them. The working rule is to divide the area you intend to cover by 8.7, round up, and add one pack for cuts on any zone with a cut edge on two or more sides. For an 8 x 8 ft (2.4 x 2.4 m) zone of 64 sq ft that is 8 packs plus one, 9 packs, $315 in acacia at $34.99 or $232 in the brown-stained version at $25.83. For a 6 x 8 ft (1.8 x 2.4 m) zone of 48 sq ft it is 6 plus one, 7 packs, $245 or $181. For the full 10 x 12 ft (3 x 3.7 m) slab of 120 sq ft it is 14 plus one, 15 packs, $525 acacia or $387 stained, and the acacia version is over budget before a chair arrives.
Cuts are done with a jigsaw or a fine hand saw through the slats and the plastic grid together, and the cut edge goes against a wall or under the furniture, never at the open edge of the slab. Which brings up the border. Tiles laid to the very edge of the slab show the plastic grid at the lip, catch a toe, and let the corner tile lift when someone steps on it. Stop the field 2 in (5 cm) short of every open edge and 1/2 in (13 mm) short of every wall, and the bare concrete around the zone reads as a deliberate border, the way a rug leaves floor showing. On the 8 x 8 ft zone inside a 10 x 12 ft slab that border is 12 in (30 cm) on the short sides and 24 in (61 cm) on the long ones, and the planters go on it.
There is one more number, and it is the thickness. The tiles sit 3/4 in (2 cm) above the concrete plus the depth of the slats, about 1 1/4 in (3 cm) total, which is a step at the threshold if the door sill sits flush with the slab. Measure the sill height before buying. If the sill is at or below 1 1/4 in, the tiles stop 24 in (61 cm) short of the door and the bare concrete there becomes the landing, or the zone moves to the far end of the slab and the door side stays concrete with the rug.
Key Takeaway: Divide the zone by 8.7 sq ft, round up and add a pack for cuts, stop the tiles 2 in short of every open edge, and check the door sill against the 1 1/4 in build-up before buying a single pack.
Resurfacer for the Slab That Is Pitted, Not Broken
 Save
Some slabs are sound but ugly in a way that stain makes worse: the surface is pitted, the top has scaled off in patches, the aggregate shows through in one corner. A stain tints the smooth areas and the rough ones differently and the patchwork gets louder. That slab wants a resurfacer, and a resurfacer is cheaper than most people expect. A 40 lb bag of polymer-modified resurfacer covers about 40 sq ft at 1/8 in (3 mm) and up to 80 sq ft as a skim coat, at $18 to $30 a bag, so three bags at $54 to $90 renew a 120 sq ft (11 sq m) slab to a fresh, even surface.
The product is a blend of cement, fine sand and polymer that bonds to old concrete and cures to a surface that looks like a new pour. It goes on thin, with a long-handled squeegee, over a slab that has been pressure washed and then wetted down so the old concrete does not pull the water out of the new mix. Work in sections you can finish in ten minutes, pull the squeegee at a low angle to fill the pits, and drag a push broom across the surface in one direction while it is still wet if you want the broom texture that hides small imperfections and gives grip. The key rule is temperature: a resurfacer wants 50 to 90 F (10 to 32 C), out of direct midday sun, and no rain for 24 hours.
What it will not do is fix a crack that moves, bridge a heave, or level a slab that has sunk on one side; those are structural and a coating cannot hold them. What it does do is give a pitted slab a clean surface that then takes a solid-colour stain or paint beautifully, because the resurfacer is uniform in porosity and colour. Which is the second reason to choose it: a resurfaced slab is the one slab where paint is the better finish, since the new surface is even, dry once cured, and takes an opaque coat without the blotching that old concrete gives. Resurface, cure for a week, paint or solid-stain, seal, and the slab that looked like a repair reads as a pour.
Key Takeaway: A pitted or scaling slab gets three bags of resurfacer at $54 to $90, squeegeed thin over a wetted surface and broomed for texture, and the fresh uniform surface is the one case where a solid finish beats a semi-transparent stain.
Crack, Pit or Heave: Which Repair Each One Gets, and What It Costs
 Save
The condition walk from the tests section produced a list, and every item on it is one of three things: a crack, a pit, or a heave. Each has one right repair and one price, and knowing which is which keeps the repair money to under $50 on most small slabs. The wrong repair, a resurfacer over a moving crack or a filler in a heave, fails in a season and takes the finish with it.
Hairline cracks under 1/8 in (3 mm) wide get nothing. They are shrinkage from the original cure, they do not move, and a semi-transparent stain reads them as character; only a solid finish shows them, and a solid finish is going over a resurfacer anyway. Cracks from 1/8 in to 1/2 in (3 to 13 mm) get a self-leveling polyurethane sealant, $17.97 for a 29 oz tube that bridges gaps to 1.5 in (3.8 cm), gunned into the crack after it is blown clean and left to level itself flush; a tube does about 40 ft (12 m) of crack at 1/4 in (6 mm). Cracks wider than 1/2 in get foam backer rod pushed in first, then the sealant over it. The sealant stays flexible, so the crack can move with the seasons without the repair letting go, which is the whole point and the reason a rigid patching mortar is the wrong product here.
Pits, spalls and scaled patches get a patching compound if there are a few, about $15 for a small tub, trowelled in and floated flush, or the full resurfacer if there are many, since three bags at $54 to $90 cost about the same as five tubs and give a uniform surface. Heaves, where one side of a crack sits higher than the other, get honesty: no filler, no coating, no resurfacer will hold a slab that is still moving, and the repair is either grinding the high edge flush with a rented grinder for about $60 a day or leaving it and placing the rug and furniture so the step is off the walking line. A heave over 1/2 in (13 mm) on the walking line between the door and the seating is the one condition where the honest answer is to spend the $500 on tiles that float over it rather than on a finish that will crack again.
Key Takeaway: Hairlines get nothing, cracks to 1/2 in get an $18 tube of self-leveling sealant, pits get a patch tub or the resurfacer, and a heave gets a grinder or a floating tile floor, never a filler.
The Outdoor Rug: The One Purchase That Sizes the Whole Patio
 Save
Of everything on the list, the rug is the purchase that makes a slab read as a room, because it draws the boundary of the seating zone the way a rug does indoors, and because it is the one soft surface on a patio made of concrete, metal and wood. On a budget it is also the item to buy well rather than cheaply: a flatwoven polypropylene outdoor rug at 5 ft 3 in x 7 ft 7 in (160 x 230 cm) is $99.99 at IKEA, with a 6 ft 7 in x 9 ft 10 in (200 x 300 cm) size at $149.99, and a $14.99 anti-slip pad under it stops the corners lifting in wind. Polypropylene is the right fibre because it does not absorb water, dries in a morning if it is stood on end in a loose roll, and holds its colour through a summer of sun.
Size is the decision, and the rule is the same as indoors: the front legs of every seat sit on the rug, and a band of floor shows on every side. On a 10 x 12 ft (3 x 3.7 m) slab, the 5 x 7 ft (152 x 213 cm) rug leaves roughly 30 in (76 cm) of concrete on the short sides and 30 in on the long, which reads as a floor with a rug on it; the 6 x 9 ft (183 x 274 cm) size leaves 18 in (46 cm) and 24 in (61 cm), which is the largest a 120 sq ft slab should take before the rug starts looking like a cover-up. On an 8 x 8 ft (2.4 x 2.4 m) slab the 5 x 7 ft is the ceiling. The rug should never run to the slab’s edge, and never up to the door; leave a landing of bare concrete at the threshold so wet feet cross concrete, not textile.
Pattern and colour follow the floor finish. Over a semi-transparent stain in warm grey, a flatweave in cream with a charcoal or rust geometric reads as intentional; over a stencilled floor, a plain rug in the base colour keeps the two patterns from arguing. Stripes running across the short axis of a narrow slab make it look wider; a border pattern makes a square slab look composed. Whatever the choice, the rug goes down after every finish has cured, a week after sealer, and it comes up and hangs to dry after any storm, because a wet rug on a sealed slab traps water against the finish for days.
Key Takeaway: Buy a flatwoven polypropylene rug sized so every seat’s front legs sit on it with 18 to 30 in of concrete showing on every side, put a pad under it, and never run it to the slab’s edge or the door.
Rug Size to Slab Size: The Matching Rule
 Save
The rug rule has numbers, and they scale with the slab. The target is a border of bare finished concrete between 18 and 30 in (46 and 76 cm) on every side, wide enough to read as floor and narrow enough that the rug still governs the space. Take the slab’s shorter dimension, subtract 36 to 60 in (91 to 152 cm) for the two borders, and that is the rug’s shorter dimension; do the same for the longer side and round down to the nearest stock size.
From the guides
You've saved it, wanted it. Here's the how: codes, measurements, order. Your choices make it yours.
The Japandi Honest PlaybookThe honest version of the style: what to keep, what to skip, and the order to do it in.See inside →The Room Refresh PlaybookA repeatable four-step method, room by room, in ten minutes, thirty minutes, or one weekend.See inside →Make Any Room Feel Cozy on PurposeWhy some rooms hold people and others empty out, and the moves that change it.See inside →For an 8 x 8 ft (2.4 x 2.4 m) slab, 96 in each way, the arithmetic gives a rug of 36 to 60 in by the same, which is a 5 x 5 ft (152 x 152 cm) square or a 4 x 6 ft (122 x 183 cm) rectangle, with two chairs and a side table on it. For an 8 x 10 ft (2.4 x 3 m) slab it gives 5 x 7 ft (152 x 213 cm), the $99.99 size, which holds two chairs and a small table with the chairs’ front legs on. For a 10 x 10 ft (3 x 3 m) slab the same 5 x 7 ft works with a wider border on the long axis, or a 6 x 6 ft (183 x 183 cm) square if the seating is a pair of chairs facing the garden. For a 10 x 12 ft (3 x 3.7 m) slab, 6 x 9 ft (183 x 274 cm) at $149.99 is the largest that keeps the 18 in border, and it holds a loveseat, two chairs and a coffee table. For 12 x 12 ft (3.7 x 3.7 m) and above, 8 x 8 ft (244 x 244 cm) or 8 x 10 ft (244 x 305 cm) sizes come in, but at that point the slab has stopped being small and the seating is a full outdoor sofa group.
Furniture on the rug follows one rule at every size: every seat’s front legs on, the table fully on, and nothing hanging over the rug’s edge onto the concrete. A bistro table with two chairs fits on 5 x 7 ft; a loveseat with two chairs needs 6 x 9 ft; a four-seat dining table needs 8 x 10 ft and a slab of 12 x 14 ft (3.7 x 4.3 m) to keep the border. Choosing the rug before the furniture, rather than after, is what keeps the seating from arriving at a size the slab cannot hold, and it is why the rug is the second purchase after the floor finish and before the chairs.
Key Takeaway: Subtract 36 to 60 in from each slab dimension to find the rug size, so an 8 x 10 ft slab takes 5 x 7 ft and a 10 x 12 ft slab takes 6 x 9 ft, and put every seat’s front legs on it.
Seating on the Slab: Two Chairs and a Table That Fold
 Save
A small slab is seated by the corner, not the centre. Two chairs and a table placed in the middle of a 10 x 12 ft (3 x 3.7 m) slab cut it into four unusable strips; the same set pushed into the corner formed by the house wall and one side of the slab leaves the rest of the concrete as a floor you can cross, and it gives the seats a wall at their back, which is the thing that makes a chair outside feel settled. The rug lands in that corner too, with its long side along the house, and the outer corners of the slab are left for pots.
The set itself should fold, for two reasons. The first is the budget: a solid acacia table with two folding chairs is $149.99 at IKEA, and a set that folds flat lives in the shed through winter instead of greying on the slab, which doubles its life. The second is the slab: a small patio changes use through the year, morning coffee for one, dinner for two, a corner cleared for a plant sale haul, and seats that fold and move let the slab do all three. A fixed outdoor sofa on a 120 sq ft (11 sq m) patio is a commitment the slab cannot afford to make.
Second-hand is the other route, and it is the better one for anything made of metal. Folding steel bistro chairs, a wrought-iron cafe table, a wooden bench with a cracked slat, all turn up on local marketplaces for a fraction of new and all take a coat of exterior spray paint in a single colour. The one thing to buy new is the cushion: an outdoor-rated cushion in a solution-dyed fabric is what makes a $20 second-hand chair a place you sit for an hour rather than ten minutes, and two of them run $30 to $50. Whichever route, keep the whole set to one wood tone and one metal finish, black or the warm brown of the acacia, so the slab reads as one composition rather than a collection.
Key Takeaway: Put two folding chairs and a small table in the corner against the house wall on the rug, buy the set new at about $150 or second-hand in metal and repaint it, and spend on outdoor cushions rather than on a fixed sofa.
How the $500 Splits: Floor, Seating, Green and Light
 Save
The budget has four jobs to do, and they are not equal. The split that holds on a 120 sq ft (11 sq m) slab, priced from the live figures above, is roughly a fifth to the floor, a third to seating, a quarter to plants, and the remainder to cleaning and light, with a small reserve because something always needs a second tube of sealant. Floor: about $100 for a gallon of stain, a gallon of sealer and a sprayer, plus $70 for the washer rental and degreaser, so $170 to arrive at a clean, stained, sealed slab. Rug: $100 for the 5 x 7 ft (152 x 213 cm) flatweave and $15 for the pad. Seating: $150 for the folding acacia set, or $60 to $80 for a second-hand metal set repainted with two new cushions. Plants: about $90 for six 1 gal shrubs and grasses at $15 each for a 12 ft (3.7 m) edge. Light: $12 for a 30-bulb solar string.
That totals $537 with new seating, $447 to $467 with second-hand. The version that comes in under $500 with everything new drops the pad and two of the six plants until next spring, which lands at $492, or swaps the acacia set for a wall-mounted folding table with one chair, and the version with second-hand seating has $30 to $50 left for a second tube of sealant and a bag of mulch. Those are real numbers from real listings, and the point of writing them down is that the $500 works only when the floor stays cheap: the moment the floor is tiles at $280 for a zone, seating and plants have to share $150, and the moment it is tiles for the whole slab at $490, there is no seating at all.
The order of spending matters as much as the split. Clean and finish the floor first, because every later purchase sits on it and nothing can be applied once the furniture is there. Rug second, because it sizes the seating. Seating third, sized to the rug. Plants fourth, because they go along the edge the rug and seats have defined. Light last, hung from points that now exist. Buy in that order and the budget shows at every step; buy the chairs first because they were on sale and the floor never gets finished.
Key Takeaway: Spend about $170 on cleaning and the stained floor, $115 on the rug and pad, $150 on seating or $70 second-hand, $90 on six edge plants and $12 on solar light, in that order, and the $500 holds only if the floor stays cheap.
Plant the Edge, Not the Slab: A 12 in (30 cm) Border That Hides the Concrete Line
 Save
The thing that makes a concrete slab look like a driveway is its edge: a hard grey line meeting lawn or gravel with nothing between. The cheapest fix in this whole article is a planted strip 12 in (30 cm) wide along the slab’s open sides, dug straight into the ground, that softens the line and makes the slab read as the floor of a garden room rather than a pad in a yard. Plants in the ground cost less than plants in pots, need less water, and grow, and six 1 gal shrubs and grasses at $15 to $28 each fill a 12 ft (3.7 m) edge for $90 to $170 depending on what you choose.
The plants are low, evergreen and repeated. Boxwood at $14.76 to $28.27 per 1 gal plant depending on the variety and pack size, planted 18 to 24 in (46 to 61 cm) apart, gives a clipped green line in a year; ornamental grasses in 1 gal pots, blue fescue, fountain grass or a compact miscanthus, planted between them at the same spacing, give movement and a softer edge; a low herb such as thyme or creeping rosemary in the gaps spills over the concrete and blurs the line completely. The rule is three kinds at most, repeated along the length, so the edge reads as a single planted band rather than a collection. One kind is stronger still: a straight row of boxwood at 18 in (46 cm) spacing is the edge that reads as designed on every patio it has ever been tried on.
Dig the strip 12 in (30 cm) wide and 10 in (25 cm) deep, fork the base, add a bag of compost, set the plants with their crowns level with the ground and 6 in (15 cm) back from the slab so they can spread onto it without being trodden, water them in, and mulch 2 in (5 cm) deep with dark bark so the soil disappears. The dark mulch against the pale stained concrete is itself a finish: the eye reads the contrast as an edge that was drawn on purpose. Plant in spring or early autumn, water every other day for the first month, and by the second summer the concrete line is gone on those two sides and the slab has a room’s worth of green at ankle height.
Key Takeaway: Dig a 12 in strip along the slab’s open sides and plant boxwood, low grasses and a spilling herb at 18 to 24 in spacing with dark mulch, about $90 for a 12 ft edge, and the driveway line disappears by the second summer.
Edge Planting by the Foot: How Many Plants a 12 ft (3.7 m) Edge Needs
 Save
The edge planting is priced by the running foot, and the count depends on spacing, which depends on the plant. Boxwood and other clipped evergreens go at 18 in (46 cm) centres for a hedge that closes in two years or 24 in (61 cm) for a row of separate mounds; ornamental grasses at 24 in (61 cm); spreading herbs at 12 to 18 in (30 to 46 cm). Divide the edge length by the spacing, and that is the count. A 12 ft (3.7 m) edge at 18 in is 8 plants; at 24 in it is 6; at 12 in it is 12.
Priced from the live listings, the boxwood row at 18 in is 8 plants at $14.76 to $28.27, so $118 to $226 depending on variety and whether you buy the four-pack; the same row at 24 in is 6 plants at $89 to $170. A mixed edge of 3 boxwood, 2 grasses and 1 herb at 24 in is about $90 to $120. Two open sides on a 10 x 12 ft (3 x 3.7 m) slab is 22 ft (6.7 m) of edge, which at 24 in spacing is 11 plants and roughly $165 to $250 in boxwood or about $170 mixed, so the honest budget move on a slab with two open sides is to plant the long side fully and put two large pots at the ends of the short side. The pots cost about the same as the plants they replace and give the edge a full stop at each corner.
The compost and mulch are the small numbers people forget. A 12 in (30 cm) by 10 in (25 cm) trench along 12 ft is about 10 cu ft (0.28 cu m) of soil turned over, which wants one 2 cu ft bag of compost forked in at about $8 and two 2 cu ft bags of bark mulch at about $5 each to cover 12 ft at 2 in (5 cm). Add a $10 bag of slow-release fertiliser in spring and the edge is fed for the year. All in, the 12 ft mixed edge is about $110 planted and mulched, the boxwood-only row at 24 in about $110 to $190. Either way the edge is the purchase that does most for the slab’s appearance per dollar after the stain, and it is the only one that gets better every year without being touched.
Key Takeaway: Divide the edge length by the spacing, 18 in for a closed boxwood hedge and 24 in for mounds or grasses, so a 12 ft edge takes 6 to 8 plants at $90 to $226, plus about $20 for compost and mulch.
Pots on Concrete: Three Big Ones Beat Nine Small Ones
 Save
Pots on a small slab follow the same rule as furniture: fewer, larger, in the corners. Nine small pots scattered along the edges read as clutter and dry out by noon; three large ones grouped at one outer corner read as a planting and hold water for two days. On the budget, large means 14 to 18 in (36 to 46 cm) across, which in plain unglazed terracotta is $20 to $40 each at the garden centre, and the plant in it is the one splurge worth making: a single 3 gal olive, bay or dwarf citrus at $40 to $60 in the tallest pot gives the corner a shape at eye height that no number of 1 gal plants can.
The three pots are three heights, tallest at the back against the slab’s corner, and three plants of three habits: one upright, one mounding, one trailing over the rim. Terracotta, matte charcoal or a single glaze colour, never a mix; the pots are one material the way the furniture is one wood. And every pot stands on feet. A pot flat on stained or painted concrete holds water under its base, and after one season there is a dark ring on the finish that does not wash off, plus a pale ring around it where the sealer has been kept damp. Three terracotta feet per pot, about $5 a set, or a pot riser, lift the base 1 in (2.5 cm) so the slab dries beneath it and the finish under the pot ages like the rest.
Placement is the corners the eye lands on: the far outer corner as you look out from the door, and the corner opposite the seating so the slab has weight on both sides. Never along the walking line from the door to the seats, and never crowding the rug, which needs its band of bare concrete to work. Two groups of three, one at each far corner, is the most a 10 x 12 ft (3 x 3.7 m) slab should carry, and one group of three at the single far corner is enough on 8 x 8 ft (2.4 x 2.4 m). Water them from a can, not the hose, so the finish around them stays dry, and in cold climates move the terracotta to the shed in late autumn before the first hard freeze cracks it.
Key Takeaway: Group three large pots of three heights and habits at one far corner, in one material and each on feet so the finish beneath stays dry, and skip the scatter of small pots that dries out and reads as clutter.
Three Lights, Three Heights: The Under-$30 Lighting Plan
 Save
Light is the cheapest layer on the list and the one most often skipped, and a slab without it is a daytime patio only. The plan that works costs under $30 and has three heights: a string overhead, a lantern at table height, and two low lights at the edge. A 30-bulb solar string is $12 at the big-box stores; a metal lantern with a pillar candle is $10 to $15; a pair of solar path lights is $8 to $12. Together they give a small slab the three planes of light a room has, ceiling, table and floor, and none of them needs an outlet, an electrician or a landlord’s permission.
The string wants two fixing points 8 to 10 ft (2.4 to 3 m) apart and 7 ft (2.1 m) or more above the slab, so the run clears a standing head and sags to a gentle curve rather than a straight line. On most small patios one point exists, the eave of the house or a hook screwed into the fascia, and the second is a tall shepherd’s hook at $15 to $20 set into the lawn or a planter at the slab’s far corner, or a screw hook into the top of a fence post. One run across the slab, roughly along the line between the door and the seating, is enough; two runs crossing read as an event, and a small slab is not one. Angle the solar panel toward the afternoon sun on the fence or the hook, and the bulbs come on at dusk and run four to six hours.
The lantern goes on the table or on the concrete beside the seats, and the path lights go in the planted edge, one at each end of the row, pointing up into the boxwood so the edge glows rather than the lawn. That is the whole plan. Warm white throughout, 2,700K where the packaging gives a number, because a cool white bulb over a warm grey slab turns it back to the driveway it used to be. Hang the string last, after the plants are in, so the shepherd’s hook lands where the edge ends rather than in its middle, and spend the ten minutes at dusk on the first night checking that no bulb sits in the sight line from the seats to the garden.
Key Takeaway: A $12 solar string run 7 ft high between the eave and a shepherd’s hook, a $12 lantern at table height and two $10 solar path lights in the planted edge give a slab three planes of warm light for under $30.
The Wall Behind the Slab: Screen, Trellis or Paint
 Save
Every small slab has at least one wall, the house, and it is the largest surface in the frame. Left as it is, a bare rendered or brick wall makes the patio feel like a service area at the back of a building; treated, it makes the slab feel like a room with the wall as its fourth side. On the budget there are three ways to treat it, and none costs more than $60. The first is a trellis panel, a cedar or pine lattice 6 ft (183 cm) tall and 2 to 4 ft (61 to 122 cm) wide at $25 to $45, screwed to the wall on 1 in (2.5 cm) spacer blocks so air moves behind it, with one climber in a large pot at its base. Star jasmine, a climbing rose or an annual sweet pea covers a panel in a season, and the wall behind the seats becomes green.
The second is paint, where the wall is rendered or painted already and the surface is sound. A gallon of exterior masonry paint, about $40, covers 300 to 400 sq ft, and the small slab’s wall is rarely more than 100 sq ft (9 sq m), so one gallon does it with a second coat. The colour follows the slab: a warm white or pale putty wall over a warm grey or taupe stain makes the two read as one room, and a wall two shades lighter than the slab lifts the whole patio. Painting only the section of wall behind the slab, from corner to corner or from the door to the edge, with a crisp taped line, is the budget version of a feature wall and it reads as intentional, not partial.
The third is a screen, and it is the answer where the wall is not the house but a fence, a neighbour’s garage or nothing at all. A reed or willow screening roll, 6 ft (183 cm) tall, at $20 to $40 for 13 ft (4 m), zip-tied to an existing chain-link or wire fence, or a single 6 x 6 ft (183 x 183 cm) cedar slat panel at $50 to $60 fixed to two posts, gives the seats a back and the slab a boundary. Whichever wall treatment, the rule is one: one surface, one colour or one material, finished from edge to edge. A half-painted wall or a trellis hung off-centre undoes the composition the floor and the rug have made.
Key Takeaway: Give the slab a fourth side with a $25 to $45 trellis and one climber, a gallon of masonry paint in a warm white two shades lighter than the stain, or a reed screen on the fence, finished edge to edge in one colour.
What Wears First: The Two-Year Maintenance Calendar for Each Finish
 Save
A $500 patio stays a $500 patio only if the parts that wear are renewed before they fail, and each finish has its own calendar. Stain and seal is the easiest: the stain itself does not wear, but the sealer over it does, and in full sun and foot traffic a wet-look or low-lustre acrylic sealer dulls in 18 to 24 months and lets the stain fade beneath it. Wash the slab each spring, and every second spring apply one fresh coat of sealer at $38.98 a gallon; the gallon does three recoats on a 120 sq ft (11 sq m) slab, so the running cost is about $13 a year. Never let the sealer wear through before recoating, because once the stain fades unevenly it cannot be evened without restaining.
Paint and stencil wear by scuffing and, where the slab is damp, by lifting. Inspect each spring for chips at the edges and under chair legs, touch up with the quart you kept, and recoat the water-based polyurethane every two years; a stencilled floor that is resealed on schedule lasts five years or more, and one that is not loses the pattern at the walking line in three. Deck tiles wear by weather: acacia greys in a season without oil, so brush on a teak or decking oil each spring at about $20 a can for a small zone, and lift the tiles each autumn to sweep the grit and leaves from the slab beneath, because a season of wet debris under the grid is what rots the slats from below.
The soft parts have the shortest calendar. The polypropylene rug is hosed and hung to dry after storms, washed with a brush and mild soap each spring, and replaced in three to four years when the weave flattens; budget for it. Outdoor cushions come in every night or live in a deck box, and even solution-dyed fabric fades in two to three summers. Solar strings run two to three seasons before the batteries tire, and a replacement string is $12. The plants are the exception: the boxwood edge needs one clip in early summer and one in late summer, the grasses a cut to 4 in (10 cm) in late winter, and both improve every year for the price of a bag of mulch. Written as a calendar, the whole patio is one weekend each spring, one gallon of sealer every second spring, and a new rug every fourth, which is a running cost under $60 a year.
Key Takeaway: Reseal a stained slab every second spring, oil acacia tiles and lift them each autumn, touch up and re-poly a stencil every two years, wash the rug each spring and replace it in three to four, and the patio’s running cost stays under $60 a year.
The View From the Door: Composing the Slab as a Room You Look Into
 Save
A small patio is looked at far more than it is sat on, and it is looked at from one place: the door. Most of the day the slab is a picture in the back window and a view through the open door, and the composition that matters is the one from that spot. Stand in the doorway before anything is placed and note what the eye lands on first, usually the far outer corner and whatever stands against the garden, and what it lands on last, usually the ground just past the threshold. The plan puts the weight at the far corner and keeps the threshold clear, so the eye travels across the slab to the green and back.
That is why the pot group goes at the far corner and the seating to one side rather than in the centre, why the rug sits off the walking line, and why a landing of bare concrete 24 to 36 in (61 to 91 cm) deep stays open at the door. It is also why the edge planting matters more on the far side than the near one: the row of boxwood at the back of the view is the line the eye rests on, and it is the line that turns the slab from a pad into a room with a far wall. On a slab with only one open edge, plant that one; on a slab with two, plant the one opposite the door first.
Height belongs at the edges and not in the middle. The olive in the tall pot, the trellis on the wall, the shepherd’s hook for the string, all stand at the perimeter and frame the view; anything tall in the centre blocks it, and a small slab cannot spare the sightline. Colour follows the same idea: the slab, the wall and the rug in three tones of one warm family, the plants and the mulch the only dark and the only green, so the eye reads one room rather than a set of purchases. Walk out, sit in each chair, look back at the door, then come inside and look out again. If the view from the door reads as a room, the patio is finished. If it reads as a slab with things on it, one of the pieces is in the middle, and moving it to an edge is the fix.
Key Takeaway: Compose the slab for the view from the door: weight and height at the far corner and the edges, the seating to one side on its rug, a clear landing at the threshold, and one warm colour family so the eye reads a room.
The Answer: What to Do With a Small Concrete Slab for $500, in Order
 Save
Here is the plan, in the order the money is spent, on a 10 x 12 ft (3 x 3.7 m) slab that passed the water test and the plastic test. Weekend one, Saturday: rent the electric pressure washer for $47, degrease with a $22 gallon, wash the slab, rinse clear, return the washer, and stop. Sunday: nothing on the slab; buy the gallon of semi-transparent stain at $36.98, the gallon of sealer at $38.98 and a $20 pump sprayer, and dig the 12 in (30 cm) trench along the long open edge. Weekend two, Saturday morning: stain the dry slab in two thin coats from the far edge to the door, four hours apart. Sunday: seal in two thin coats. Running total $165.
Week three, any evening: plant the edge, six 1 gal boxwood and grasses at about $90, with a bag of compost and two of mulch at about $20; water them in. Weekend three: the rug at $99.99 and its $14.99 pad go down in the corner by the house, then the seating on it, the folding acacia set at $149.99 or a second-hand metal pair repainted for $70; then the three pots at the far corner, using pots and plants you already own where you can, and the $12 solar string from the eave to a $15 shepherd’s hook. Running total $567 new, $487 with second-hand seating. The version that comes in under $500 with new seating skips the rug pad, swaps the shepherd’s hook for a screw hook in a fence post, plants three shrubs now and three next spring, and uses pots you already own, which lands at about $494.
If the slab failed the water test, add the etcher at $23.97 on the cleaning day and the plan holds. If it failed the plastic test, the plan holds with stain only, no paint and no stencil. If it is pitted, add three bags of resurfacer at $54 to $90 between cleaning and staining, and switch the stain to a solid colour. If it is a rental and nothing can go on the concrete, swap the stain and sealer for nine packs of brown-stained deck tiles at $232 on an 8 x 8 ft (2.4 x 2.4 m) zone, keep the rug and the pots, and take the second-hand seating route so the total lands near $500. Four versions of one answer, and the slab’s own tests pick which.
Key Takeaway: Clean, stain and seal over two weekends for $165, then plant the edge, lay the rug, add the folding seats, group the pots and hang the solar string, in that order, and the slab is a finished room for $487 to $567 depending on the seating.
So, what can you actually do with a small concrete patio for under $500? You can keep the slab, which has already paid for the expensive part, and spend the money on the four things that make it a room: a clean, stained and sealed floor for under $1 per sq ft, a flatwoven rug sized to leave 18 to 30 in (46 to 76 cm) of concrete showing, two seats that fold in the corner against the house, and a 12 in (30 cm) planted edge along the open side, with a $12 solar string over the top. The two tests decide the finish before a dollar moves, the cost-per-square-foot ladder decides how much floor the budget can carry, and the order of spending, floor, rug, seats, plants, light, is what makes the result look bought rather than assembled. Pour the cup of water on the slab this evening, tape down the plastic before bed, and by the morning you will know which of the four versions is yours.
From the guides
You've saved it, wanted it. Here's the how: codes, measurements, order. Your choices make it yours.
The Japandi Honest PlaybookThe honest version of the style: what to keep, what to skip, and the order to do it in.See inside →The Room Refresh PlaybookA repeatable four-step method, room by room, in ten minutes, thirty minutes, or one weekend.See inside →Make Any Room Feel Cozy on PurposeWhy some rooms hold people and others empty out, and the moves that change it.See inside → Save


