 Georgia
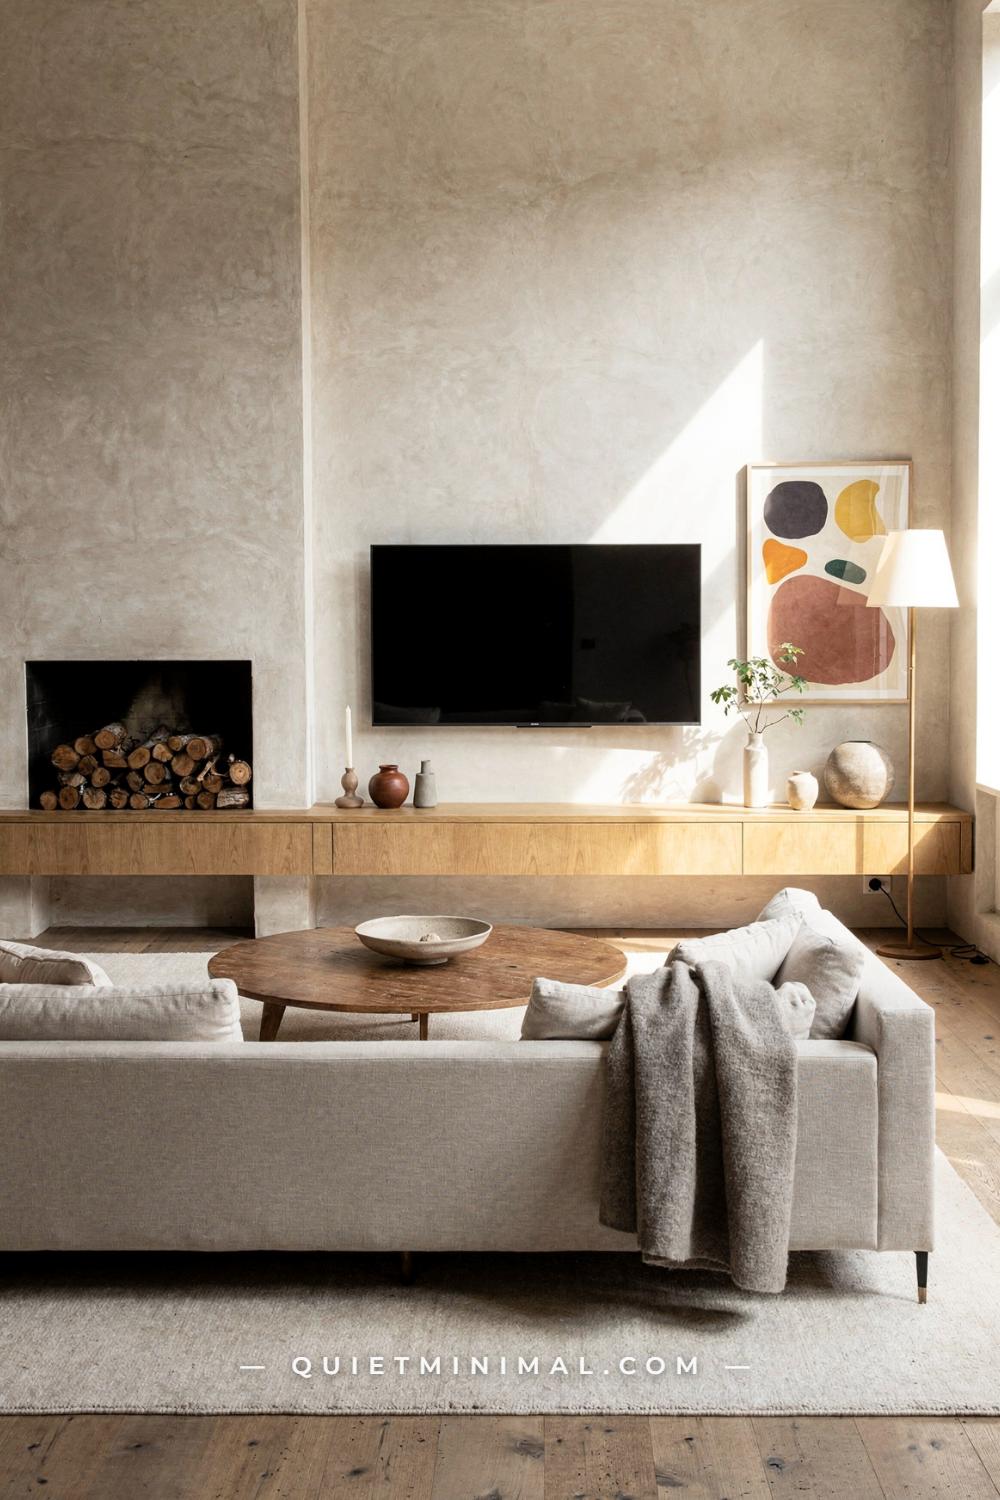
A living room with a fireplace and a television has two focal points that both want the best wall. Put the TV above the mantel and everyone cranes their necks. Push it into a corner and the sofa can face only one of them. The room ends up arranged around a compromise nobody quite chose.
A TV next to fireplace layout solves this by treating the two as one composition on one wall, side by side, sharing a console, a shelf line or a run of built-ins, so the eye reads a single calm wall instead of two competing ones. It takes planning, and the planning has an order: measure, decide the hierarchy, set the screen height, unify the wall, then arrange seating, cables, light and styling.
This guide follows that order, one stage at a time. Each stage ends with a definition of done, so you can stop at any point and still have a working room. Measurements are inch-first, and every stage can be done with a tape measure, painter’s tape and an afternoon before you commit to a single bracket.
A quick note on safety, because it shapes several stages. Fireplaces produce heat, and televisions are electronics with their own temperature limits. Both manufacturers publish clearances, the distances the screen, the console and any decor must keep from the firebox and the space above it. Find both manuals before you start and keep them open as you plan; every measurement in this guide sits inside those limits, never in place of them. Throughout, the fireplaces pictured are shown cold and unlit, which is how most living rooms spend most of the year.
Stage One: Measure the Wall and the Sightlines
 Save
Every good TV next to fireplace layout starts with three measurements, and none of them is the size of the television. First, the length of the wall the fireplace sits on, from corner to corner. Second, the distance from the fireplace’s center line to each corner, because most fireplaces are not perfectly centered. Third, the distance from the wall to where your main seat will be.
The wall length tells you whether side-by-side is even possible. A fireplace with a surround of about 60 in (152 cm) needs a TV zone of at least 50 to 60 in (127 to 152 cm) beside it, plus a little breathing room at the corner. On a wall shorter than about 12 ft (3.7 m), side by side gets tight, and an alternative such as a TV on an adjacent wall or in a built-in may work better.
The offset of the fireplace matters because it often decides which side the TV goes. Put the TV on the longer side of an off-center fireplace and the wall balances itself. Put it on the shorter side and the composition crowds into one corner.
The seating distance decides the screen size. A common rule of thumb for modern 4K screens is a viewing distance of about 1.5 times the screen diagonal. A 55 in (140 cm) screen sits comfortably about 7 ft (2.1 m) away; a 65 in (165 cm) screen about 8 to 9 ft (2.4 to 2.7 m). Buying a screen too large for a side-by-side layout is a common mistake, because it then outweighs the fireplace.
Now tape the shapes on the wall. Cut painter’s tape or kraft paper to the exact size of the screen and the console you are considering, and mark them on the wall beside the fireplace. Live with the tape for a few days. Sit in every seat, look from the doorway and check where daylight falls on the taped screen at different times of day.
Windows deserve special attention. A screen on a wall facing a bright window will reflect it; a screen on the same wall as the window will be backlit and hard to watch in daylight. The best side for the TV is usually the one at right angles to the main window.
Done looks like this: you know the wall length, the fireplace offset and your seating distance, and you have a taped outline on the wall that looks right from the main seat and the doorway.
Photograph the taped wall from the main seat and from the doorway, then look at the photos on your phone later. A photo flattens the room the way a guest’s first glance does, and problems of balance that you stop noticing in person become obvious on a small screen. If the taped TV looks heavier than the fireplace in the photo, try the next size down before you buy.
Note the outlets and any cable access while you measure. Where the nearest power outlet sits, and whether there is a way to run cables behind the wall, may tip the decision between two otherwise equal positions. It is far easier to plan around an existing outlet than to add one later.
It also helps to sketch the wall to scale on graph paper, one square to every 6 in (15 cm). Draw the fireplace, the windows, the doors and the outlets, then cut a paper rectangle for the TV and slide it along the wall. Ten minutes with a sketch often settles a decision that would otherwise take weeks of second-guessing, and it gives you a plan to hand to whoever helps you mount the screen.
Keep your notes in one place: a single page with the wall length, the fireplace offset, the seating distance, the planned screen size and the outlet positions. Every later stage refers back to those numbers, and having them together prevents the small inconsistencies that make a finished wall look slightly off.
Key Takeaway: Measure the wall, the fireplace offset and the seating distance, then tape the screen and console on the wall and live with it before buying or drilling.
Stage Two: Decide Which One Leads
 Save
With the measurements done, the second stage is to decide which focal point leads. In most rooms, one should be clearly dominant and the other should support it. When both are equally prominent, the wall feels like a standoff.
This traditional craftsman living room makes the fireplace the leader. A full-height stacked fieldstone chimney with a dark wood mantel of about 60 by 8 in (152 by 20 cm) anchors the center of the wall. Flanking dark walnut built-in shelving units, each about 36 in (91 cm) wide and 84 in (213 cm) tall with cabinet uplighting, hold books and objects, and the television is housed in the right cabinet. A beige sectional and a tufted dark leather club chair face the hearth across a taupe and cream medallion rug.
The TV here is present but secondary. It sits at a comfortable height inside the built-in, framed by the same walnut as the shelves on the other side, so it reads as part of the cabinetry rather than a black rectangle competing with the stone.
This is the right choice when the fireplace is architecturally strong: stone, brick, a tall chimney breast or a period surround. Let it lead and tuck the screen into a supporting role.
When the fireplace is modest, a simple insert in a plain wall, the TV can lead, with the fireplace treated as a horizontal accent beneath or beside it. Either way, decide before you build.
A good test is to ask which one you look at most. If you use the fireplace mainly in winter and watch TV every evening, the TV may deserve the better position at seated eye level, while the fireplace becomes the room’s architectural anchor.
Built-ins are the most effective way to give the TV a supporting role. Matching cabinets on either side of the fireplace, with the screen recessed into one, keep the wall symmetrical and calm. When the TV is off, a cabinet door or a sliding panel can hide it entirely.
The firebox here is shown clean, dark and unlit, which is how most of the year looks in a living room. Design the wall for that state as well as for winter evenings.
Done looks like this: you have decided whether the fireplace or the TV is the leading focal point, and your plan gives the other a clearly supporting role.
Look at the room’s other architecture before deciding. Ceiling beams, window placement and door positions all pull the eye. A fireplace centered under a beam or between two windows is already the focal point, and the TV should step back. A fireplace tucked to one side of a plain wall gives you more freedom to let the screen lead.
Think about the room’s use across the year as well. In a cold climate, the fireplace may be the heart of the room for half the year; in a mild one it may be lit only a few times. Let the hierarchy follow how the room is actually lived in, not how it looks in a listing photo.
When the fireplace leads, give it the best light in the room too. Uplighting a stone chimney or placing sconces on either side of a mantel reinforces its role, while the TV stays in softer shadow. When the TV leads, keep the fireplace surround simple and quiet so it supports rather than competes. The lighting plan should agree with the hierarchy you chose.
Whichever leads, make the decision visible in the materials. The leader gets the richest material on the wall, such as stone, brick or plaster; the supporting element sits in plainer surroundings. That contrast of material is what tells the eye which way to look first.
Key Takeaway: Decide whether the fireplace or the TV leads, then give the other a supporting role so the wall never feels like two focal points in competition.
Stage Three: Set the Two Side by Side on One Plane
 Save
The third stage is the side-by-side arrangement itself, and the key is that the two share a wall plane, a line and a palette. This Japandi living room shows it at its calmest.
A plaster fireplace column on the left holds a recessed gas insert, shown cold and unlit, with floating oak ledge shelves above and beside it lit by warm LED strips. On the right, the TV is mounted on a smooth plaster wall above a compact oak media cabinet of about 36 by 16 by 20 in (91 by 41 by 51 cm). Floor-to-ceiling black steel windows flood the right side with diffused daylight. A low linen sofa with a charcoal throw faces the wall, and a round oak coffee table of about 36 in (91 cm) holds a ceramic bowl and a candle.
The two zones are tied together by material and line. Both sit against warm greige plaster. The oak of the shelves repeats in the media cabinet. The bottom of the TV aligns roughly with the shelf line on the fireplace side, so the eye reads one horizontal band across the wall.
Aligning one line is the simplest way to unify a side-by-side layout. Choose the top of the mantel, the top of the console or the bottom of a shelf, and line up the bottom or center of the TV with it. When those lines match, the wall looks designed. When they miss by a few inches, it looks accidental.
Keep the zones in proportion. The TV should rarely be wider than the fireplace surround next to it. If it is, consider a slightly smaller screen or a larger fireplace surround so the two feel balanced.
Space between the two matters as well. Leave at least 12 to 18 in (30 to 46 cm) between the edge of the fireplace surround and the edge of the screen, both for heat clearance and for visual breathing room. Check the fireplace manufacturer’s guidance for side clearances to combustible and electronic items.
The Japandi palette of greige plaster, honey oak, matte black and ivory linen keeps both elements quiet. A black screen against plaster and black steel windows feels at home rather than intrusive.
Done looks like this: the fireplace and the TV sit on one wall, aligned on a shared horizontal line, with comfortable space between them and the same materials repeated on both sides.
If the wall has no existing shelves, add a simple ledge or a pair of floating shelves on the fireplace side at the height of the TV’s bottom edge. That one shelf creates the shared line, and it gives the fireplace side a little weight to balance the dark rectangle of the screen.
Check the screen’s finish in daylight. A matte or anti-glare screen behaves far better in a room with big windows, like this one, than a glossy panel. If you are buying a new TV for a side-by-side layout near windows, it is worth looking at reflections in person before choosing.
Ledge shelves above a fireplace also give you a place to soften the black of the screen across the wall. A matte black vase, a dark ceramic or a black-framed print on the fireplace side repeats the screen’s color, so the TV reads as one of several dark notes rather than the only one. That small trick is one of the most effective ways to make a television look at home.
Side-by-side layouts also make it easier to enjoy both at once. With the fire lit and a film on, the screen and the flames sit within the same view, which is exactly the evening most people picture when they imagine a living room with both.
Key Takeaway: Align the TV with one line on the fireplace side, such as a shelf or mantel height, and repeat materials across both zones so they read as one wall.
Stage Four: Mount the Screen at Seated Eye Level
 Save
The fourth stage is height, and this is the one most layouts get wrong. The center of a TV screen should sit at roughly the eye level of a seated adult, which for most sofas is about 40 to 45 in (102 to 114 cm) from the floor. Above a mantel, screens often end up at 60 in (152 cm) or more, which means looking up for the length of a film.
One of the great advantages of a side-by-side layout is that it frees the TV to sit at the right height. Without a mantel underneath it, the screen can come down to where the eyes naturally rest.
To find your height, sit in your main seat, look straight ahead at the wall and have someone mark where your eyes meet it. That mark is roughly where the center of the screen should be. For a 55 in (140 cm) screen, which is about 27 in (69 cm) tall, that usually puts the bottom edge around 27 to 30 in (69 to 76 cm) from the floor, just above a low console.
Low consoles help. A console about 16 to 20 in (41 to 51 cm) tall lets the screen sit low without crowding it. Leave about 4 to 6 in (10 to 15 cm) between the top of the console and the bottom of the screen.
Choose a mount that suits the room. A fixed low-profile mount keeps the screen close to the wall and looks tidy. A tilting mount helps if the screen must sit a little higher. An articulating arm lets you swing the screen toward different seats, which is useful in an L-shaped room, but it projects further from the wall.
Mount into studs or solid masonry. Use a stud finder, check the mount’s weight rating against the screen and follow the manufacturer’s instructions. On plaster or brick, use the anchors specified for that material.
Done looks like this: the center of the screen sits at seated eye level, the bottom edge clears the console by a few inches and the mount is fixed securely into studs or masonry.
Remember that seated eye level depends on the sofa. A deep, low sofa puts eyes closer to 36 in (91 cm) from the floor, while an upright sofa puts them nearer 44 in (112 cm). Measure from the sofa you actually have, and if a new sofa is coming, wait for it before mounting the screen.
If several people with very different heights watch together, aim for the middle. A tilting mount angled down a few degrees helps taller viewers without straining anyone else, and it reduces glare from overhead lights as well.
Before drilling, hold the screen, or a cardboard template of it, against the wall at the planned height and sit down. Watch for a few minutes. If you find yourself lifting or dropping your chin, adjust. The right height feels so natural that you stop noticing it, which is exactly the goal.
Note your final height on the wall in pencil before drilling, and check it once more from the sofa with the cardboard template in place. A single measurement checked twice saves patching and redrilling a wall that has just been finished.
Key Takeaway: Mount the TV with its center at seated eye level, about 40 to 45 in from the floor, which a side-by-side layout makes possible.
Stage Five: Run One Long Console Under Both
 Save
The fifth stage is the console, and in a side-by-side layout it does more work than any other piece of furniture. A single long console running beneath both the TV and the fireplace ties them into one composition.
This minimalist living room mounts the TV flush to a smooth plaster wall beside a floor-to-ceiling rough-textured stone fireplace column with a built-in insert, shown cold and unlit. A full-width low ribbed white media console of about 120 by 18 by 16 in (305 by 46 by 41 cm) runs beneath both. A round channeled velvet ottoman of about 48 in (122 cm) in warm biscuit sits centered on a cream rug with a burgundy knit throw draped across it, and a large bird of paradise in a white ceramic pot stands at the left.
The console is the horizontal line that makes the wall work. Without it, the stone column and the TV would be two vertical elements floating on the wall. With it, they become one long, low arrangement.
A full-width console also hides the practical clutter: streaming boxes, game consoles, cables and remote controls. Choose one with closed doors or drawers, and cut cable holes in the back panel so everything stays connected but invisible.
Size the console to the wall rather than the TV. In a side-by-side layout, it should run beneath both elements and stop a little short of the corners, or meet them if you want a built-in look. A console around 16 in (41 cm) tall keeps the screen low and lets the fireplace’s base read clearly.
Check fireplace clearances for any console that runs near the firebox. Hearth extensions and side clearances vary by fireplace type, so follow the manufacturer’s guidance and keep the console’s closed cabinets and any electronics outside the hot zone.
Ribbed fronts add texture without color, which suits a minimalist room. Stone, ribbed lacquer and velvet give three textures in one cream and sand palette, and the single burgundy throw is the only accent.
Done looks like this: one long low console runs beneath both the TV and the fireplace, hides the equipment and respects the fireplace’s clearances.
If a full-width console is too large for your budget or room, two matching low cabinets, one under the TV and one beside the fireplace, can create the same line. Keep their tops at exactly the same height and use the same finish, and the eye will join them.
Style the console sparingly. Two or three objects at the fireplace end, a lamp or a plant at the other, and nothing in front of the screen. The console’s job is to be the calm horizontal that holds the wall together, not another display surface.
A long console also gives the wall a sense of permanence, as if the television and fireplace were planned together from the start. That is the impression the whole layout is working toward: not a TV added to a room with a fireplace, but a wall designed around both.
Leave a little space at the ends of the console. Stopping about 6 to 12 in (15 to 30 cm) short of each corner lets the console read as a piece of furniture rather than a shelf pushed wall to wall, unless you want the built-in look.
Key Takeaway: Run a single long, low console under both the TV and the fireplace to tie them into one composition and hide the equipment.
Stage Six: If the Screen Must Go Above, Plan for It
 Save
The sixth stage is the exception. Some rooms simply have no space beside the fireplace, and the TV has to go above it. If so, plan it carefully rather than settling for a screen hung high on a nail.
This traditional sitting room has a black cast-iron log burner of about 22 by 14 by 25 in (56 by 36 by 64 cm) on a slate hearth, shown cold and unlit, flanked by cream-painted alcove shelving with warm LED strip lighting. The TV is mounted above a raw oak beam mantel of about 60 by 5 by 8 in (152 by 13 by 20 cm) on the chimney breast. A linen pendant hangs from the white plaster ceiling, a cream armchair sits on the left and a soft gray sofa on the right, with a jute rug and a chunky knit blanket.
Three things make an above-the-fireplace TV work. First, a mantel or beam that deflects heat away from the screen; check both the stove maker’s and the TV maker’s guidance on clearances above a heat source. Second, the lowest possible mounting height that still respects those clearances. Third, a tilting or pull-down mount that brings the screen’s angle or height closer to seated eye level.
Pull-down mounts lower the screen in front of the mantel when you watch and lift it back when you do not. They cost more than a fixed mount but solve the neck-strain problem.
Alcove shelving on either side of the chimney breast balances an above-mantel TV. The shelves add symmetry and give the wall depth, so the screen does not dominate.
Seat farther back with an above-mantel TV. Increasing the viewing distance reduces the upward angle.
Done looks like this: if the screen has to sit above the fireplace, it is mounted as low as clearances allow, on a tilting or pull-down mount, with balanced shelving on either side.
Consider mounting the TV a little off center on the chimney breast if the mantel allows. A screen centered over a fireplace is the convention, but a slightly lower position on a pull-down mount is better than a perfectly centered one hung high.
If you are building or renovating, ask about a recessed niche for the TV above the mantel. A niche lets the screen sit flush with the chimney breast, which looks cleaner and can make it easier to bring the screen a little lower within the clearance rules.
If the TV must sit above the fireplace and the fire is used often, measure the temperature on the wall above the mantel during a long evening with the fire lit, using a simple thermometer taped where the screen would be. If it stays within the TV maker’s operating range, the position is workable; if not, look again at a side position or a different room.
Whatever the mount, check that the cables can reach the screen at its lowest pulled-down position as well as its stored one. Pull-down mounts move the screen a long way, and cables cut to the stored position will strain or disconnect.
Key Takeaway: If the TV must go above the fireplace, use a heat-deflecting mantel, the lowest safe height and a tilting or pull-down mount, and balance it with alcove shelving.
Stage Seven: Set a Linear Fireplace Below the Screen
 Save
The seventh stage is an option for modern rooms: a linear fireplace set low in the wall beneath the TV. Done carefully, the two read as one long horizontal composition.
This modern open living room centers a large TV on a venetian plaster accent wall in warm greige, with a full-width ribbon linear fireplace of about 96 by 12 in (244 by 30 cm) inset below it, shown cold and unlit. A floating light oak media console of about 120 by 18 by 12 in (305 by 46 by 30 cm) spans the wall beneath, stacked floating wood shelves at the right hold dark ceramic vases and small plants, and a cream wool rug and natural stone coffee table sit in front.
A linear fireplace placed low in the wall keeps the TV at a comfortable height above it, because the fireplace itself is only about 12 in (30 cm) tall. That is the difference from a traditional firebox, which pushes the TV up.
Electric and some gas linear fireplaces are designed with media walls in mind and list the clearances needed above them. Follow those exactly; they are what protect the screen.
A venetian plaster wall unifies the composition. The soft, polished texture runs behind both the TV and the fireplace, and the eye reads one surface with two elements set into it.
Stacked shelves to one side add asymmetry and a place for objects, so the wall does not look like a showroom display.
Done looks like this: a low linear fireplace and the TV share one textured wall, with the screen at a comfortable height above and clearances respected.
Linear fireplaces also suit open-plan rooms because their long, low shape echoes the long lines of modern sofas and consoles. In a room that also contains a kitchen or dining area, a low horizontal wall of plaster, flame and screen reads as one calm architectural element rather than a cluster of appliances.
Plan the wall’s depth carefully. A media wall with a linear fireplace usually needs to be built out from the original wall to house the firebox, venting or electrics and the TV cables. A built-out wall of about 12 to 18 in (30 to 46 cm) is common, and it gives a satisfying sense of solidity.
Linear fireplaces also give a more even, gentle look than a traditional firebox when they are not in use. A dark glass strip in a plaster wall is quieter than a black opening, which helps the wall feel calm on summer days when the fire is off.
Choose the console finish to match the plaster or the shelving, not the screen. A pale oak or plaster-colored console keeps the wall soft; a black console under a black screen makes the lower half of the wall heavy.
Key Takeaway: A low linear fireplace beneath the TV keeps the screen at a comfortable height, as long as you follow the fireplace’s media-wall clearances.
Stage Eight: Build a Wall That Holds Both
 Save
The eighth stage is the most complete solution: a built-in wall that holds the TV, the fireplace and storage in one piece of joinery.
This contemporary living room has a full-width floor-to-ceiling oak built-in wall of about 180 by 12 by 108 in (457 by 30 by 274 cm). The TV is set into the center of an open-shelf oak framework, flanked by closed cabinet columns with long bar pulls. A concrete-surround fireplace is recessed at the right, shown cold and unlit, and a raw wood beam crosses overhead. Two large deep-seated white linen sectionals face the wall, and a rectangular low black coffee table of about 60 by 30 by 15 in (152 by 76 by 38 cm) holds a monstera leaf in a glass vase.
A built-in turns the TV and fireplace into features of one architectural wall. Every element sits in its own compartment, and the open shelving around the screen softens it with books and objects.
Plan the built-in around the screen you will own in five years, not just the one you have now. Leave a little extra width and depth in the TV opening, and provide ventilation behind it.
Concrete, oak and white linen give a calm contemporary palette. The black coffee table repeats the black screen at a lower height, which ties the screen into the room.
Done looks like this: a single built-in wall contains the TV, the fireplace and storage, with ventilation and room to upgrade the screen.
Built-ins can be made in stages. Start with the lower cabinets and the TV opening, then add the upper shelving later when budget allows. Planning the full design from the start ensures each stage fits the next.
Lighting inside built-ins, such as small LED strips under the shelves, softens the whole wall in the evening and keeps the TV opening from looking like a dark hole between lit shelves.
When designing a built-in wall, keep the depth consistent across the whole run. Cabinets, shelves and the TV opening all at the same depth read as one piece of furniture, while varying depths look like several pieces pushed together.
If a full built-in is out of reach, freestanding bookcases on either side of the fireplace, with the TV on a console between them, give a similar effect. Choose matching pieces and fix them to the wall for safety.
Key Takeaway: A full-width built-in holds the TV, fireplace and storage as one architectural wall, planned with room and ventilation for a future screen.
Stage Nine: Angle the Seating to Face Both
 Save
The ninth stage is seating. In a side-by-side layout, the sofa can face the center of the wall, between the two, so both are visible without turning.
An L-shaped sectional is the most flexible answer. One run faces the fireplace, the other the TV, and the inside corner gives a view of both. Place the coffee table at the inside of the L so everyone can reach it.
If you have a straight sofa, center it on the midpoint between the fireplace and the TV, not on either one alone. Add a pair of chairs angled slightly toward the fireplace for conversation.
Keep the distance consistent with your screen size from stage one, and leave at least 36 in (91 cm) for walkways around the seating.
Done looks like this: every seat can see both the fireplace and the screen without twisting, and walkways stay clear.
Think about where people actually sit during each activity. On a film night, most people want the sofa facing the screen; on a winter evening, they want to sit closer to the fire. An L-shaped sectional serves both, while a single straight sofa centered on the TV leaves the fireplace end feeling like an afterthought.
Leave room for a side table at each end of the sofa. In a layout that faces a wall, side tables give people somewhere to put a drink without reaching to the coffee table, and they give lamps a home at the right height for reading.
A deep sectional also benefits from a slightly larger rug and a coffee table sized to about two-thirds of the sofa’s length. In a side-by-side layout, a round or oval coffee table at the inside of the L keeps the walking route soft and lets people slip past easily.
If the room is narrow, consider a sofa with a chaise rather than a full L. The chaise faces the screen, the sofa’s main seat faces the center of the wall, and the room keeps more floor space.
You've saved it, wanted it. Here's the how: codes, measurements, order. Your choices make it yours.

Test the seating plan with tape on the floor before buying a new sofa. Mark the outline of the sectional and the coffee table, then walk around it and sit on chairs placed in the outline. A plan that works on the floor almost always works in real life.
Remember the view from the doorway. When you walk in, you should see the seating arranged around the wall, not the back of a sofa blocking the fireplace. Angle the seating so the entrance looks into the group.
Key Takeaway: Center the seating between the fireplace and the TV, ideally with an L-shaped sectional, so every seat sees both comfortably.
Stage Ten: Add Swivel Chairs for the Second View
 Save
The tenth stage is flexibility. Swivel chairs are the simplest way to let seats face either the fireplace or the TV, depending on the hour.
Place a pair of swivel chairs between the two zones, facing the fireplace by default. On a film night they turn toward the screen; on a winter evening they face the fire.
Choose low-backed swivels so they do not block the view from the sofa, and a seat height of about 17 to 19 in (43 to 48 cm) to match the sofa.
A round rug under the chairs defines their zone and makes the pair look deliberate.
Done looks like this: a pair of swivel chairs gives the room a second view, without moving any furniture.
Swivel chairs also earn their place in conversation. When friends come over, they can turn toward the sofa, making the seating group feel like a circle rather than a row facing a wall.
Choose a swivel mechanism with a gentle return or a simple 360 degree base, and look for upholstery that is easy to clean, such as performance boucle or tightly woven linen. In a busy living room, swivel chairs are used constantly and need to stand up to it.
Keep swivel chairs a little closer to the fireplace than the sofa. They become the warm seats in winter, the place for a book and a cup of tea, while the sofa remains the film-night seat.
If you have space for only one chair, a single swivel chair angled toward the fireplace still gives the room flexibility, and it balances a sofa centered on the TV.
A small round side table between two swivels gives each chair a surface for a cup or a remote and keeps the coffee table clear for the sofa.
Rotate the chairs toward each other as well as toward the wall. A slight inward angle between two swivels makes them read as a pair and invites conversation even when they face the fireplace.
Swivel chairs also suit small living rooms, where there is space for only two or three seats. One pair that turns either way does the work of two separate seating groups.
Leave room for the turn. A swivel chair needs roughly 4 to 6 in (10 to 15 cm) of free space around its widest point to rotate without scuffing a side table or the sofa arm, so measure the chair’s diagonal as well as its width before you settle the spacing. A barrel chair 30 in (76 cm) wide can sweep closer to 34 in (86 cm) as it turns.
Watch the sightline from the sofa, too. With the chairs sitting between the two focal points, their backs should stay below the line from the sofa cushions to the bottom edge of the screen. A back height of about 28 to 30 in (71 to 76 cm) usually clears it, while a wingback at 40 in (102 cm) will cut off the lower third of the picture for anyone sitting behind it.
Key Takeaway: Add low swivel chairs between the fireplace and the TV so the seating can turn to whichever one the evening calls for.
Stage Eleven: Hide Every Cable Before You Hang
 Save
The eleventh stage is cables. Nothing undoes a carefully planned wall like a tangle of black cords hanging from the screen.
Plan the cable route before mounting the TV. The cleanest option is an in-wall power and cable kit rated for the purpose, which brings power and signal through the wall behind the screen and out behind the console. Follow the kit’s instructions and local electrical codes; standard power cords should not be run inside walls.
In masonry or rented homes, use a paintable surface raceway painted the wall color, running straight down behind the console.
Keep the equipment inside the console, with ventilation, and use a single power strip with surge protection.
Done looks like this: no cables are visible between the screen and the console, and all equipment sits inside closed storage.
Plan the equipment before the cables. Decide what will connect to the TV: a streaming device, a sound bar, a game console. Each needs power and signal, and knowing the list lets you size the in-wall kit or raceway correctly.
A sound bar mounted under the screen or placed on the console needs its own cable route. Plan it at the same time, so it does not end up with a dangling cord.
For a fully hidden setup, consider a wall-mounted streaming device behind the TV and a single HDMI cable through the wall to the console. The fewer cables there are, the simpler the route.
Label every cable at both ends before it disappears into the wall or console. When something stops working, you will be grateful to know which cable is which without pulling everything out.
If you cannot open the wall, a paintable raceway running straight down from the screen to the console, painted the wall color, almost disappears. Keep it vertical and centered under the screen so it reads as a deliberate line rather than an afterthought.
Once cables are hidden, keep it that way. Use cable clips inside the console to tidy the runs, leave a little slack for future changes and keep the power strip off the floor so dust does not collect around it.
If you mount the TV on a masonry chimney breast, use a masonry drill bit and anchors rated for the TV and mount weight, and avoid drilling into the flue. When in doubt, ask a professional to check the chimney construction first.
Mark the two wall plates before anything else. On most in-wall kits the upper plate sits behind the screen, a few inches below its top edge, and the lower plate sits about 12 to 16 in (30 to 41 cm) above the floor, where the console hides it. Check the depth of the mount as well: a low-profile mount that holds the screen 2 to 3 in (5 to 8 cm) off the wall leaves little room for plugs, so a recessed outlet box keeps them from pushing the screen forward.
Give the console a small cutout in its back panel, about 3 by 5 in (8 by 13 cm), lined up with the lower plate. Every cord then drops straight into the cabinet, nothing crosses the floor, and nothing loops around the hinges when the doors close.
Key Takeaway: Route cables through an in-wall kit or a painted raceway before mounting, so the finished wall shows no cords at all.
Stage Twelve: Light the Wall Without Glare
 Save
The twelfth stage is lighting. Lights that reflect in the screen or shine in your eyes ruin a good layout.
Avoid recessed lights directly in front of the screen; their reflections appear in the glass. Light the fireplace side with wall sconces aimed upward, and place lamps to the side of the seating rather than behind the screen.
Soft light behind the TV, a bias light, reduces eye strain in a dark room.
Done looks like this: no light source reflects in the screen from the main seats, and the fireplace side has its own soft light.
Use warm white bulbs around 2700K in sconces and lamps for evenings. They complement a fire and make the room feel warm, while cooler light can make a screen look harsh.
Put living room lights on dimmers. Bright light for reading and conversation, low light for films and fireside evenings, and a single wall switch to move between them.
Watch out for windows behind the seats. Daylight from behind the sofa reflects in the screen; sheer curtains or blinds solve the problem during the day without darkening the room.
Accent lights on the fireplace side, such as picture lights over art on the mantel or LED strips on alcove shelving, give the wall a soft glow that balances the screen.
Test the lighting at night with the TV on. Sit in every seat and look for reflections, then adjust lamp positions or shades until the screen is clear.
Finally, consider the color of light from the fireplace itself. A warm, flickering fire creates its own soft light on winter evenings, so when the fire is lit, dim the other lamps and let it lead, then bring them back up for the film.
Smart bulbs or a simple scene switch make it easy to move from bright daytime light to a film setting with one touch. Setting up two or three scenes is a small task that makes the room much more pleasant to use.
Map the reflections before you buy a single fixture. With the screen off, sit in the main seat once in daylight and once after dark, and note every bright object you can see in the glass: a window, a ceiling fixture, a white lampshade. Each one is a light source to move, shade or dim, and a dark screen shows them more honestly than a bright picture does.
Sconces on the fireplace side look best with their centers about 60 to 66 in (152 to 168 cm) from the floor and at least 6 in (15 cm) outside the edge of the surround. At that spacing the light washes the wall around the fireplace instead of the hearth, and its glow stays out of the screen’s reflection from the sofa.
Key Takeaway: Light the fireplace side with sconces and the seats with side lamps, and keep any light source out of the screen’s reflection.
Stage Thirteen: Let the Screen Disappear When It Is Off
 Save
The thirteenth stage is concealment. A black rectangle on the wall is the least attractive object in most living rooms when it is off.
Cabinet doors, sliding panels or a frame-style screen set into joinery let the TV disappear. In a side-by-side layout, a cabinet that closes over the screen lets the fireplace become the only focal point between films.
Shelving around the screen also helps. Books and ceramics around a dark screen make it read as one object among many.
Done looks like this: when the TV is off, it is hidden or absorbed into shelving, and the fireplace leads the room.
Frame-style TVs that display art when off are an option, but choose abstract images or plain color fields. A large black rectangle with a single abstract image looks calmer than a screen showing busy pictures.
Sliding panels made from the same material as the wall or cabinets, such as oak or plaster-finish board, let the TV disappear completely. They work especially well in built-ins.
Fabric screens or folding doors can also hide a TV in a traditional room, though they need careful detailing to look deliberate.
In a smaller room, simply choosing a smaller screen makes it easier to absorb. A screen sized for the seating distance rather than the largest available keeps the fireplace in charge.
When the TV is hidden or absorbed, style the fireplace as the room’s focus: a few objects on the mantel, a mirror or abstract art above, and a basket of logs by the hearth.
If you prefer the TV visible, frame it intentionally. A narrow wood or painted frame around the screen, matching the console or shelving, turns it into a deliberate object rather than a piece of electronics stuck to the wall.
When a screen hides behind doors, ventilation matters. Leave gaps above and below the cabinet doors, or use doors that fold fully back, so the TV and equipment do not overheat while in use.
Size doors and panels around the real screen, not the advertised diagonal. Measure the set with its bezel and mount, then allow about 1 to 2 in (3 to 5 cm) of clearance on every side inside the cabinet. Pocket and bifold doors also need a side cavity as deep as the doors themselves, so settle the hardware before the joinery is drawn.
Remember the remote. Most screens read the remote through a small sensor along the bottom edge, and streaming boxes or sound bars hidden behind solid doors may not respond at all. A small infrared repeater inside the cabinet, or equipment that pairs over Bluetooth, keeps everything working with the doors closed.
Key Takeaway: Hide the screen behind doors or absorb it into shelving so the fireplace can lead the room when the TV is off.
Stage Fourteen: Anchor the Arrangement With the Rug
 Save
The fourteenth stage is the rug. Center it on the seating group, not on the fireplace or the TV, so the arrangement reads as one zone facing one wall.
Size it so at least the front legs of every seat rest on it, typically 8 by 10 ft (2.4 by 3 m) or larger for a sofa and two chairs. Keep it clear of the hearth for safety.
Done looks like this: one rug ties the seating together, centered between the fireplace and the TV and clear of the hearth.
Choose a rug with a quiet pattern or a plain texture. Two strong focal points on the wall already compete for attention; a busy rug adds a third.
Layering a smaller rug over a large jute or wool base can define the seating area in a large room while keeping the floor warm.
Rugs near a fireplace should be kept at a safe distance from the hearth, and natural fibers such as wool are a safer choice than synthetics near heat.
Align the rug’s edges with the wall, not with the fireplace or the TV. A rug square to the wall reads as part of the room’s architecture.
In an open-plan room, the rug also marks where the living area ends and the dining or kitchen area begins, which helps the side-by-side wall feel like the end of its own room.
The rug’s color can also bridge the two focal points. A rug that picks up the stone or brick of the fireplace and the dark tone of the screen connects them through the floor, which is especially useful in a large room.
If the room has wood floors, use a rug pad to keep the rug from sliding and to protect the floor. Pads also make thinner rugs feel more substantial underfoot.
Measure the hearth clearance from the front edge of the hearth extension, not from the firebox. The noncombustible hearth in front of a wood-burning opening typically runs 16 to 20 in (41 to 51 cm) deep, depending on the size of the opening, and the rug should start beyond that line with a few extra inches to spare.
Tape the rug’s outline on the floor before ordering. If the tape lands under the console or crowds the hearth, drop to the next size down and let the rug hold the seating alone. It only needs to gather the people; the wall already has its own console and its own line.
Key Takeaway: Center the rug on the seating group between the two focal points, with every seat’s front legs on it and the hearth clear.
Stage Fifteen: Handle a Corner Fireplace Differently
 Save
The fifteenth stage covers a common variation: the corner fireplace. Here the TV usually goes on the adjacent wall, and the seating faces the corner between them.
Angle the sofa toward the corner so both are within a comfortable turn of the head. Keep the TV close to the fireplace’s corner rather than far down the wall, so the two still read as a pair.
Done looks like this: the TV sits on the wall next to the corner fireplace, and the seating faces the corner between them.
Corner fireplaces often come with awkward walls on both sides. Shelving or a low cabinet on the other adjacent wall balances the TV and stops the room from feeling lopsided.
Use a rug angled to match the seating, or a round rug, so the arrangement does not look as if it is fighting the room’s rectangle.
Mount the TV at seated eye level on the adjacent wall, as in stage four, and run a console beneath it toward the fireplace corner.
Check that the main window does not reflect in the screen on the new wall. Corner layouts often move the TV onto a wall that faces a window, so look again at glare.
A corner fireplace with a TV beside it can feel cozy and intimate, because the seating faces a corner rather than a wall, enclosing the group.
Plan any built-ins in a corner layout with special care, since they must fit two walls and a diagonal. A carpenter can scribe cabinets to an uneven corner so they fit snugly; off-the-shelf pieces rarely do.
In a corner layout, a single large plant in the opposite corner balances the fireplace and gives the room a second vertical element, which keeps the arrangement from tilting visually toward one side.
Check the viewing angle from every seat. A screen on the wall beside a corner fireplace looks best when the main seat faces it within about 30 degrees of straight on, because many panels lose contrast and color past that point. A low-profile articulating mount lets you turn the screen 10 to 15 degrees toward the seating without pulling it far off the wall.
Stop the console at least 12 in (30 cm) short of the fireplace surround. The hearth keeps its own clearance, the corner has room to breathe, and the two pieces read as neighbors rather than one jammed against the other.
Key Takeaway: With a corner fireplace, mount the TV on the adjacent wall close to the corner and angle the seating to face between them.
Stage Sixteen: Style the Wall and Stop
 Save
The final stage is styling, and the rule is restraint. A wall with a fireplace and a screen already has two strong elements; it needs very little else.
Style the mantel and console with a few objects: a vase with branches, candles, a short stack of books. Keep objects away from the screen’s edges and out of the fireplace’s heat zone.
Done looks like this: the wall carries only a handful of objects, and the fireplace and TV read as one calm, finished composition.
Choose objects that suit both the fireplace and the screen: natural materials, simple shapes and a tight palette repeated on both sides. A pair of matching vases, one on the mantel and one on the console, ties the two zones together.
Avoid placing anything directly in front of the screen. Objects that creep onto the console in front of the TV block the view and make the screen look crowded.
Plants soften the wall. A tall plant at the end of the console or beside the fireplace adds height and life without competing with either focal point.
Let the season change the styling. Branches in spring, candles and wool in winter, a few new objects now and then, and the wall stays fresh without any change to the layout itself.
Step back to the doorway one last time. If the wall reads as one calm composition, with the fireplace and the TV sharing a line and a palette, the layout is done.
Finish with one personal object on the mantel, something chosen rather than bought to fill space. A wall planned this carefully deserves at least one piece that tells the room who lives there.
Keep a small basket nearby for remotes, so the console and coffee table stay clear. A tidy wall stays calm only if its surfaces stay calm too.
Key Takeaway: Style the mantel and console with a few quiet objects and stop, so the fireplace and TV remain one calm composition.
A TV next to fireplace layout works when you follow the order: measure, decide which leads, set the screen at seated eye level, unify the wall with one console or built-in, then arrange seating, cables, light and styling around it. Each stage is simple on its own; the calm comes from doing them in sequence.
Start with painter’s tape this week. Tape the screen and console beside your fireplace at the height and size you are considering, sit in your main seat and look. If it feels right from the sofa and the doorway, you have a plan worth drilling for.
Then take the stages one weekend at a time. Mount the screen, then bring in the console, then deal with cables and lighting, then the seating and the rug, and finish with a few objects on the mantel. By the end, the fireplace and the TV will no longer feel like rivals for the same wall. They will feel like two parts of one room that was planned that way from the start.
You've saved it, wanted it. Here's the how: codes, measurements, order. Your choices make it yours.
 Save


