 Georgia
You have a small patio, a number in your head, and a folder of saved photographs that never say what any of it cost. Small patio ideas on a budget usually stop at the ideas. This block starts at the number. It takes an ordinary 8 x 10 ft (2.4 x 3 m) slab, balcony or side yard and prices the decisions in the order you should make them: what to measure first, what $150, $400 and $800 actually buy, what each floor costs per square foot, where the seat goes, what to buy second-hand, the three things that give a cheap patio away, and the one place to spend more than you planned. The ideas you already saved still work. They just work better in this order.
Measure the Footprint Before You Spend the First Dollar
 Save
Every cost on this page is a price per square foot multiplied by a number you do not have yet. Get it first. Pace the floor with a tape: an 8 x 10 ft (2.4 x 3 m) slab is 80 sq ft (7.4 sq m), a 5 x 12 ft (1.5 x 3.7 m) terrace is 60 sq ft (5.6 sq m), a balcony can be 30 sq ft (2.8 sq m). Then measure the longest wall, because that is where the seat goes, and count the hours of direct sun at noon, because that decides whether shade is the second purchase or the last.
The numbers rule out more than they rule in. A terrace 5 ft (152 cm) deep takes a corner bench 90 in (228 cm) long by 24 in (61 cm) deep and a 20 x 20 in (51 x 51 cm) folding table, and still leaves 30 in (76 cm) to walk past. It does not take a four-piece conversation set, whatever the listing says. A 28 in (71 cm) rattan disc on the wall and a 14 in (36 cm) pot in the corner are all the decoration that depth can carry. Write three numbers down, floor area, longest wall, noon sun, and price everything that follows against them.
Key Takeaway: Measure floor area, longest wall and noon sun hours before anything else, because every price below is a per-square-foot number waiting to be multiplied.
The $150, $400 and $800 Rungs, and What Each One Buys
 Save
The ladder is cumulative. Each rung includes the one below it, so you can stop at any rung and have a finished patio rather than a half-done one.
From the guides
You've saved it, wanted it. Here's the how: codes, measurements, order. Your choices make it yours.
 The Japandi Honest PlaybookThe honest version of the style: what to keep, what to skip, and the order to do it in.See inside →
 The Room Refresh PlaybookA repeatable four-step method, room by room, in ten minutes, thirty minutes, or one weekend.See inside →
 Make Any Room Feel Cozy on PurposeWhy some rooms hold people and others empty out, and the moves that change it.See inside →
$150 buys a patio that works on the floor you already have. Roughly $50 goes to a polypropylene rug sized to the seating, $40 to a solar string light, $40 to two terracotta pots holding one large plant and some cuttings, and $20 to a can of exterior paint for the chairs you already own. It buys no furniture; it borrows chairs from indoors and paints them.
$400 buys the $150 kit plus a real floor and real seats. About $160 covers 80 sq ft (7.4 sq m) of pea gravel with landscape fabric under it and a metal edge around it, and about $90 covers a second-hand pair of metal chairs and a bistro table from the classifieds. The patio now has a ground plane and something to sit on that was made for outside.
$800 buys the $400 patio plus a ceiling and a proper seat. Around $220 goes to a shade sail with its hardware, $80 to the lumber and screws for a built-in corner bench, and $100 to outdoor foam and covers for it. That is the rung where the photographs start to look like yours.
Key Takeaway: Stop at any rung and the patio is complete; the rungs add a floor, then seats, then a ceiling, never a pile of accessories.
Pea Gravel and Four Slabs: The Floor That Looks Finished for the Least
 Save
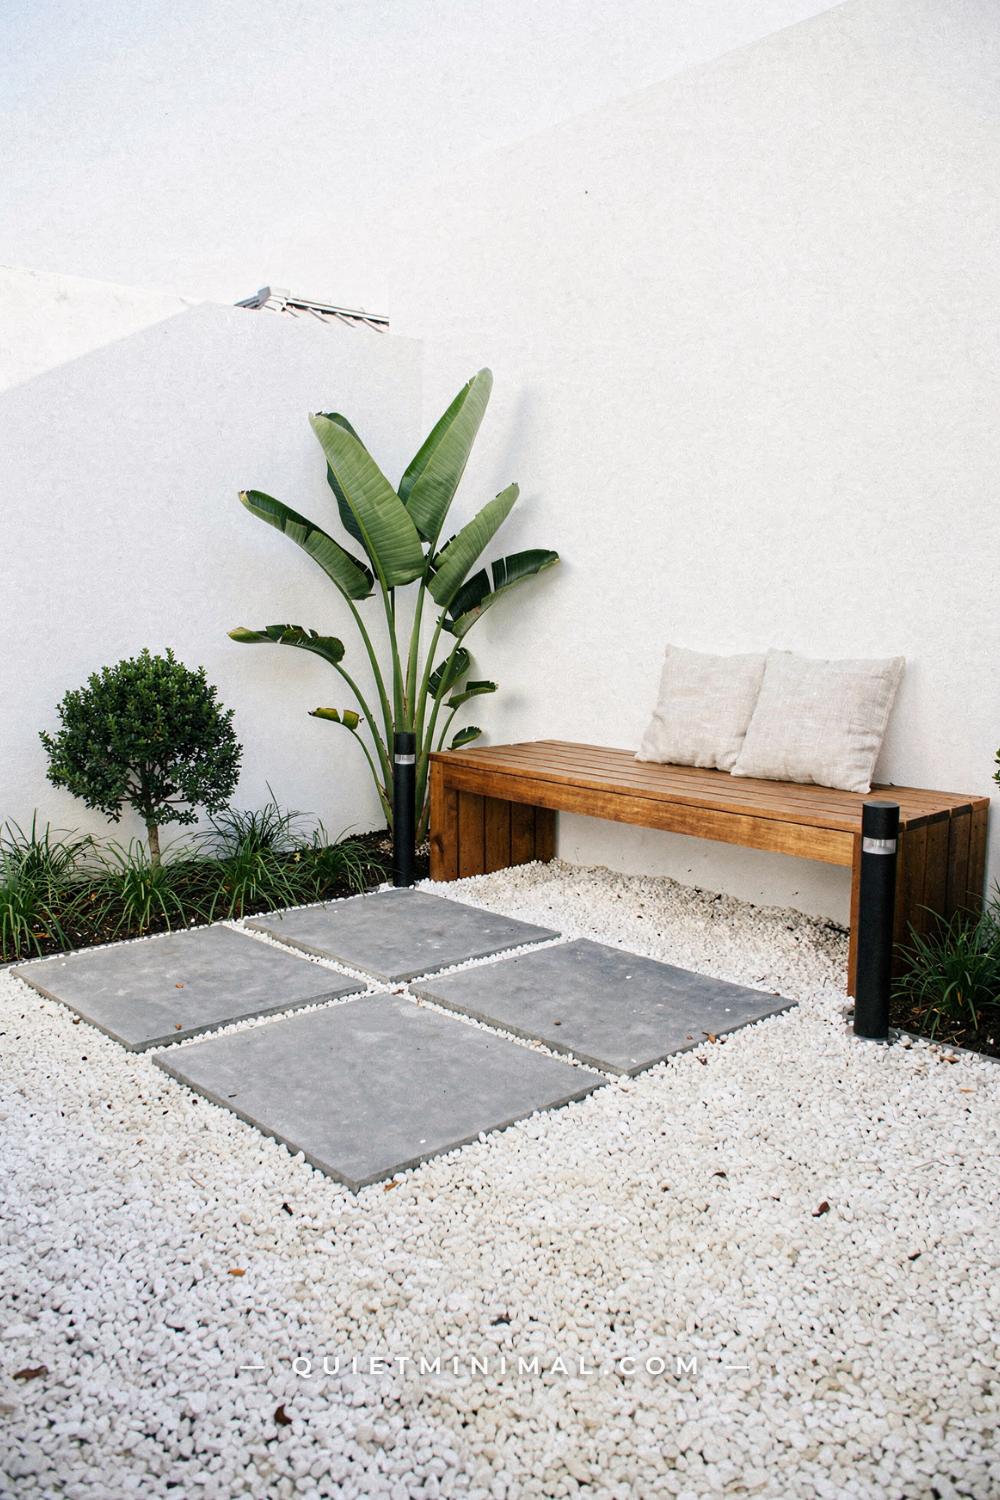
If the patio is bare earth, a tired corner of lawn or a cracked slab you would rather cover, pea gravel with a few large pavers set into it is the cheapest floor that reads as designed rather than temporary. The stone runs $0.50 to $1.50 per sq ft, so 80 sq ft (7.4 sq m) at a 2 in (5 cm) depth is a single bulk delivery, and four 24 x 24 in (61 x 61 cm) grey concrete slabs laid as stepping pads give the eye a rhythm and your feet a dry route to the bench.
The part people skip is what makes it work. Landscape fabric underneath stops the gravel sinking into the soil within a season, and a hard edge, steel strip, timber or a course of bricks, stops it wandering into the lawn. White or cream pea gravel bounces daylight up into a walled corner; the slabs sit flush with the top of the stone, never proud of it, so a chair leg does not rock. Keep the planting in the bed behind the bench, a bird of paradise in the corner and low grasses along the wall, so the gravel stays a floor and does not become a rockery.
Key Takeaway: Pea gravel over fabric with four 24 in (61 cm) slabs is the cheapest floor that looks intended, provided you pay for the edge that holds it in.
Gravel, Pavers or Deck Tiles: The Cost per Square Foot, Multiplied
 Save
Three floors cover a small patio properly, and they price very differently once you multiply by 80 sq ft (7.4 sq m).
Pea gravel is the cheapest: $0.50 to $1.50 per sq ft for the stone, $2 to $5 per sq ft if someone installs it, so $40 to $120 in material for the whole patio plus fabric and edging. It goes over bare ground, drains itself, and wants a top-up of stone every year or two.
Concrete pavers are the durable middle: $2 to $5 per sq ft for the pavers themselves and another $2 to $4 for the compacted gravel and sand base beneath them, so $5 to $10 per sq ft DIY and $8 to $15 installed. That is $400 to $800 in materials for 80 sq ft, plus a rented plate compactor at $50 to $120 for the day, because a hand-tamped base is why paver patios heave.
Interlocking deck tiles are the balcony and slab answer: snap-together acacia tiles work out to about $4 per sq ft, composite versions $7 to $15, so $320 to $1,200 for the same patio. They lay over an existing hard surface in an afternoon with no base at all, and lift off when a lease ends.
Choose by what is under your feet now: bare ground takes gravel, a long-term home takes pavers, a slab or balcony takes tiles.
Key Takeaway: For 80 sq ft, gravel is roughly $40 to $120 in materials, pavers $400 to $800 and deck tiles $320 to $1,200, and the surface you already have decides which one applies.
Build the Seat Into the Corner, Not Into the Middle
 Save
Freestanding chairs are the expensive way to seat people on a small patio: every chair needs its own footprint plus the room to pull it out. A built-in L-bench along two walls seats four to five people on 96 in (244 cm) of wall and takes no more floor than a single armchair. The frame is 2 x 4 lumber on a ledger screwed to the wall, the top is decking boards, and the whole thing comes to about $80 in timber and screws at the $800 rung. The corner is where it goes because a corner gives you two backrests for free.
Get the seat numbers right and no cushion has to correct them. Seat height 17 to 18 in (43 to 46 cm) from the finished floor including the cushion, seat depth 22 to 24 in (56 to 61 cm) so people can sit back, and a top that overhangs the frame by 1 in (2.5 cm) so rain drips clear of the timber. Put a low round table in the crook of the L, 24 in (61 cm) across and 14 to 16 in (36 to 41 cm) tall, and one rattan chair opposite for the fifth seat. Ivory cushions and a single printed pillow are all the color the bench needs when the wall behind it is warm cream stucco and the pergola above it carries bougainvillea.
Key Takeaway: A corner L-bench at 17 to 18 in (43 to 46 cm) seat height and 22 to 24 in (56 to 61 cm) deep seats five on the floor space of one armchair.
What to Buy Second-Hand and What Has to Be New
 Save
The $400 rung’s seating budget is $90 because it assumes the classifieds, not the garden center. Second-hand is the right answer for anything that is metal, hardwood or clay. Cast aluminum frames do not rust and clean up with soap and water. Wrought iron that has rusted is still a good buy: wire-brush it, prime it with a rust-inhibiting primer and give it two coats of matte black exterior spray, a two-hour job. Teak and acacia frames that have gone silver sand back to honey in an afternoon and take a coat of oil. Terracotta pots, concrete planters, a bistro table with its two chairs, a side table and wooden crates all improve with age or cost almost nothing to refinish.
Buy new the things that hold water or wiring. Used cushions carry mildew in foam you cannot wash out. A used outdoor rug has already spent its UV life. String lights with two seasons on the wiring fail in the third. An umbrella with one bent rib never sits straight again. Landscape fabric, foam and covers are cheap new and worthless used.
The test is simple: if it can be sanded, brushed or painted, buy it used; if it is soft or electrical, buy it new.
Key Takeaway: Metal, hardwood and clay go on the second-hand list; cushions, rugs, wiring and fabric are always bought new.
The Cinder-Block Counter: One Work Surface Changes How the Patio Gets Used
 Save
A small patio with seating only gets used for sitting. Add one surface at table height and it starts hosting: potting in the morning, lunch at noon, a pitcher of lemonade and two glasses at five. The cheapest version is two stacks of standard 8 x 8 x 16 in (20 x 20 x 41 cm) cinder blocks, three high for 24 in (61 cm), with a single cedar plank 72 in (183 cm) long and 10 in (25 cm) wide laid across the top and fixed with construction adhesive. The whole counter comes in under $40 in blocks and one plank, and a second plank across the lower blocks makes a shelf for pots.
Two teak folding stools with an 18 in (46 cm) seat tuck fully beneath it, so the counter costs no floor when it is not in use. Set it against the wall with the best light, paint that wall white so the raw grey blocks read as a choice rather than a leftover, and let a vine trail over the top of the brick. A single 4 in (10 cm) terracotta herb pot on the plank is the only styling it needs; anything more and it becomes a shelf again.
Key Takeaway: Two cinder-block stacks and a 72 in (183 cm) cedar plank make a table-height work surface for under $40, with the stools stored beneath it.
The One-Weekend Order, Hour by Hour
 Save
Saturday, 8 to 10: clear everything off, measure, and mark the floor with string and pegs; decide the bench wall and the table wall now, not later. 10 to 1: level the ground, lay landscape fabric and fix the edge. 1 to 5: spread gravel to 2 in (5 cm) and rake it, or snap the deck tiles in, working from the wall outward; set the stepping slabs flush with the top of the stone.
Sunday, 9 to 12: build or place the seating and put the largest plant in its corner; screw the bench ledger to the wall before anything else is in the way. 12 to 3: fix the shade sail anchors and hang the string light at 7 to 8 ft (213 to 244 cm); everything overhead goes up while the floor is still clear. 3 to 5: rug, cushions, table, pots, and a pitcher of something cold.
The order matters because each step needs the previous one out of the way: edge before gravel, floor before seats, overhead before furniture. Reverse any pair and you do that job twice, and twice is where a weekend patio becomes a three-weekend patio.
Key Takeaway: Floor on Saturday, seats and overhead on Sunday, soft things last, and nothing gets moved twice.
A Canvas Sail Is the Cheapest Ceiling a Patio Can Have
 Save
A patio with no shade gets used before ten and after six. The ceiling is the purchase that gives you the hours in between, and the cheapest ceiling is a shade sail: $50 to $200 for a pre-made sail, $56 to $100 for a hardware kit of pad eyes, turnbuckles and snap hooks, and $200 to $600 all in when the walls or a fence post can take the anchors. The moment you need a new post set in concrete, the job jumps to $800 and beyond, which is why the sail belongs to the $800 rung and only when three fixing points already exist.
Size it to the seating, not the patio: a 10 x 10 ft (3 x 3 m) sail covers a corner sectional 84 in (213 cm) across and the coffee table in front of it. Fix one corner 12 in (30 cm) lower than the others so rain runs off, and tension it until it hums; a slack sail flaps, chafes and looks like a tarp. Cream or sand canvas throws a softer light than white and hides pollen. Under it, a grey wicker corner sectional, a slim teak coffee table 42 x 20 in (107 x 51 cm) and a jute rug are all the patio needs.
Key Takeaway: A tensioned 10 x 10 ft (3 x 3 m) sail on three existing fixing points, one corner dropped 12 in (30 cm), buys the midday hours for $200 to $600.
Three Layers of Light, and Which Rung Pays for Each
 Save
Overhead first: a string of warm bulbs at 2700K, hung at 7 to 8 ft (213 to 244 cm) so nobody reaches into it, run along the seating side rather than zigzagged across the whole patio. At the $150 rung it is solar; expect two to three hours of light after a full day of sun and a battery that wants replacing every year or two. At the $400 rung it is plug-in, from an outdoor GFCI outlet, and it stays on as long as you do.
Middle next: one wall sconce or plug-in lantern at 60 to 66 in (152 to 168 cm), mounted on the wall behind the bench so faces are lit from the side rather than from above. In a rental this is a battery lantern hung on a hook at the same height. It is the layer that turns the bench into a room.
Low last: two or three lanterns or solar stakes at floor level around the edge of the patio, marking the step and the path. This is the cheapest layer and the one most often skipped, and it is the one that makes the space read deeper after dark.
All three at 2700K, all three on before the sun is fully down, and the patio lasts three more hours a night.
Key Takeaway: String at 7 to 8 ft (213 to 244 cm), a sconce at 60 to 66 in (152 to 168 cm), a lantern on the floor, all warm white, in that order.
The Cedar Screen: Build the Wall You Need Instead of the Fence You Cannot Afford
 Save
A small patio does not need privacy on four sides. It needs it on one sightline, usually the neighbor’s upstairs window or the gap in the fence at the end of the bench. A horizontal cedar slat panel 90 x 60 in (228 x 152 cm), 1 x 4 boards screwed to two posts with a 3/4 in (2 cm) gap between boards, blocks that one line of sight for about the price of a single fence section and looks like something an architect specified. Untreated cedar goes silver in a year and stays sound for many more; if you want it to keep the honey color, oil it once each spring.
Put the panel directly behind the seat, because that is where people look at you from, and let the rest of the boundary stay whatever it already is. Two black planters 18 x 18 in (46 x 46 cm) with clipped conifers flank the sofa and finish the panel’s edges. A pea gravel floor with a curved cobble border and a slim black-frame coffee table 40 x 20 in (102 x 51 cm) keep everything below the screen quiet, so the wood is the thing you see. Under an overcast sky the cedar is the warmest surface on the patio, which is exactly its job.
Key Takeaway: One 90 x 60 in (228 x 152 cm) cedar slat panel behind the seat blocks the sightline that matters for the cost of a single fence section.
The Three Things That Give a Budget Patio Away
 Save
Cool-white bulbs. A 5000K string turns cushions grey and skin blue, and it is the most common tell in a budget patio photograph. The fix costs nothing extra: buy 2700K, which is printed on every box, and put every bulb on the patio at the same temperature, including the solar stakes.
A rug smaller than the seating. When the rug floats in the middle with the chair legs off it, the patio reads as staged. The front legs of every seat go on the rug: a two-seat bench and a table need 5 x 8 ft (152 x 244 cm), a corner sectional needs 6 x 9 ft (183 x 274 cm). Buy the size first and the pattern second.
Plastic in the sightline. Black nursery pots, resin stacking chairs and white cable ties are the three plastics that read as unfinished. Drop the nursery pot inside a terracotta one 2 in (5 cm) wider, spray the resin chair matte black or replace it from the classifieds, and use black ties tucked behind the rail where they cannot be seen.
None of the three fixes moves the budget by more than $30, and together they are most of the distance between “on a budget” and “looks like it cost more”.
Key Takeaway: Warm bulbs, a rug under the front legs and no visible plastic are three fixes under $30 each that carry most of the finished look.
One Big Plant, Then Cuttings: The Green That Costs Less Than It Looks
 Save
Plants are where a budget disappears one pot at a time. Ten small pots cost more than one large plant and look like a garden center shelf. The rule is one anchor, two mid-size, and everything else grown. Spend on a single tall specimen, a monstera, a palm or a snake plant in a 14 in (36 cm) terracotta pot for the corner, and fill the rest with cuttings and divisions: pothos roots in a jar of water within a fortnight, snake plants divide at the root, ferns split in spring. A friend with a healthy plant is worth more than a nursery.
Stagger the heights so the eye climbs: the 14 in (36 cm) anchor standing 5 ft (152 cm) tall in one corner, a 10 in (25 cm) pot at knee height beside the table, 6 to 8 in (15 to 20 cm) pots on a shelf or the counter. Keep every pot in the same two materials, terracotta and matte black, and the collection reads as a decision instead of an accumulation. Against white painted brick and a cedar slat panel, a round charcoal-top table 36 in (91 cm) across with two black wire chairs sits inside the green rather than beside it.
Key Takeaway: One 14 in (36 cm) anchor plant, two mid-size pots and cuttings for the rest, all in two pot materials, is the green that costs least per square foot of leaf.
The Single Splurge: Cushions Made for Outside
 Save
If the $800 rung stretches to $900, the extra hundred goes to one line and one line only: the seat cushions. Ranked by the hours of use they give back, the splurge order is cushions, then shade, then lighting, then floor, then planters. The seat is the thing you touch every time you use the patio; the floor is the thing you look at from the door.
From the guides
You've saved it, wanted it. Here's the how: codes, measurements, order. Your choices make it yours.
The Japandi Honest PlaybookThe honest version of the style: what to keep, what to skip, and the order to do it in.See inside →The Room Refresh PlaybookA repeatable four-step method, room by room, in ten minutes, thirty minutes, or one weekend.See inside →Make Any Room Feel Cozy on PurposeWhy some rooms hold people and others empty out, and the moves that change it.See inside →What is inside the cushion is what you are paying for. Standard polyurethane foam used outdoors lasts a season or two before it holds water and smells; reticulated dry-fast foam drains straight through and lasts five to eight years. Around it, solution-dyed acrylic fabric keeps its color for years where a printed polyester fades in one summer. A 96 in (244 cm) bench takes two 48 x 24 x 3 in (122 x 61 x 8 cm) seat cushions, and the covers need zips so they can go through the wash.
Everything else on the ladder can be replaced cheaply when it wears. The cushions are the one piece that, bought right once, you do not buy again for the life of the bench.
Key Takeaway: Put the one overspend into dry-fast foam and solution-dyed covers for the bench, and rank shade, light, floor and planters behind it.
Three Materials and One Color: The Free Rule That Makes It Look Bought
 Save
The difference between a patio that looks assembled and one that looks designed is rarely money. It is the count of materials. Pick three, rattan, cream linen and matte black, say, or teak, terracotta and white, and let every purchase be one of them. Two rattan tub chairs 28 in (71 cm) wide with cream cushions, a drum wicker table 22 in (56 cm) across, a round jute rug 36 in (91 cm) across, two black floating shelves 20 in (51 cm) wide with ferns on them, one honey-oak slat panel behind. Nothing on that balcony cost much and nothing on it argues with anything else.
The one color is the accent you allow beyond the three materials, and here it is green, which comes free with the plants. Cushions in the same cream as the walls, a ceramic vase of dried pampas in the same sand as the rug, and the eye stops counting objects and starts reading a room. When a fourth material tempts you, a striped pillow or a copper lantern, ask what it replaces. If the answer is nothing, it waits for next year’s rung.
Key Takeaway: Three materials, one accent color, and every new purchase either belongs to the set or replaces something in it: the rule costs nothing and reads as money.
What Wears Out First: The Replacement Calendar for Everything on the Ladder
 Save
A budget patio is cheap in the first year. It stays cheap only if you know what comes back around. Every season: the rechargeable battery in a solar string, and a top-up of pea gravel at roughly a tenth of the original volume. Every two to three seasons: the solar string itself, a polypropylene rug, and printed polyester pillow covers. Every three to five seasons: untreated pallet or pine furniture, unless it was sealed, in which case it reaches five or more; the polyurethane foam in cheap cushions goes sooner. Every five to eight years: reticulated foam cushions, an oiled acacia deck tile floor, and a mid-quality HDPE shade sail, with the better sails reaching ten to fifteen. Past twenty years: concrete pavers on a compacted base, cast aluminum frames, and terracotta pots that come indoors for winter.
Read down that list and the ladder explains itself. The $150 rung is the fastest to wear out and the cheapest to replace. The $800 rung’s floor and bench are the slowest. Spend low on what you will buy again anyway, and spend once on what you will not.
Key Takeaway: Solar strings and rugs are two-to-three-season purchases, foam and sails five to eight years, pavers and cast metal twenty plus, so pay by how often you will pay again.
The original ideas from this article continue below.
Transforming your small patio into a cozy, stylish retreat doesn’t have to be expensive. You can start by utilizing vertical space with wall-mounted planters or a vertical garden, instantly adding greenery without taking up floor space. DIY furniture projects, like a pallet sofa, can provide seating while keeping costs low. Multi-functional pieces, like storage ottomans, maximize space efficiently. There’s more to explore in making your outdoor space both functional and inviting.
- Install wall-mounted planters to save space and enhance greenery.
- Create a pallet sofa for budget-friendly, customizable seating.
- Use solar-powered string lights to illuminate your patio affordably.
- Add outdoor rugs to define spaces and add color without major renovations.
- Stack wooden crates for versatile and inexpensive storage options.
Optimize Vertical Space
 Save
When you’re working with a small patio, don’t forget to utilize the vertical space to maximize your area. Install wall-mounted planters to add greenery without taking up valuable floor space.
You can also hang shelves to store garden tools, decor, or even small potted plants. Consider using a vertical garden or trellis for climbing plants, which adds a lush, green backdrop without crowding the patio.
Hanging lanterns or string lights can create ambiance without cluttering the ground. Think about adding hooks for hanging baskets or outdoor accessories. Using walls, fences, and other vertical surfaces will free up more room for relaxation and entertaining.
Don’t underestimate the power of thinking vertically to make your small patio feel spacious and functional.
DIY Outdoor Furniture
 Save
Why not save money and personalize your space by creating your own DIY outdoor furniture? It’s easier than you might think, and you can tailor each piece to fit your unique style and needs.
You can transform inexpensive materials into functional and stylish patio furniture with a few basic tools and some creativity.
Here are four ideas to get you started:
- Pallet Sofa: Stack and secure wooden pallets, add cushions, and have a cozy outdoor sofa.
- Cinder Block Bench: Use cinder blocks and wooden planks to create a sturdy and modern bench.
- Cable Spool Table: Repurpose an old cable spool into a rustic table perfect for outdoor dining.
- Crate Storage: Paint and stack wooden crates for a versatile storage solution that doubles as seating.
Budget-Friendly Lighting
 Save
Now that your DIY furniture is set let’s illuminate your patio with budget-friendly lighting options that add ambiance without breaking the bank.
Start with solar-powered string lights. They’re affordable, eco-friendly, and perfect for creating a warm, inviting glow. Drape them around your seating area or weave them through a pergola for a magical effect.
Another great option is LED lanterns. They’re versatile, energy-efficient, and come in various styles to match your decor. For a cozy vibe, place a few battery-operated candles on your tables. They’re safe and add a charming, flickering light.
Multi-Functional Pieces
 Save
Multi-functional pieces are a smart way to maximize your small patio space without overwhelming it. Opt for furniture and accessories that serve more than one purpose. You’ll save space and money while creating a versatile outdoor area.
Here are four multi-functional pieces to consider:
- Storage Ottomans: Use them as extra seating, footrests, and storage for cushions or garden tools.
- Folding Chairs and Tables: Easily stow them away when not in use to free up space.
- Convertible Benches: Find ones that can transform into picnic tables or even loungers.
- Plant Stands with Shelves: Display your favorite plants while storing books, candles, or drinkware.
These pieces will help you craft a functional and stylish patio without breaking the bank.
Add Greenery
 Save
To further enhance your small patio, adding greenery can bring life and vibrancy to your outdoor space.
Start by placing potted plants in various sizes and shapes around the patio. Hanging plants can save space while adding a lush, vertical element.
You might also consider a small herb garden, which not only looks great but also provides fresh ingredients for your cooking.
Don’t forget about climbers and vines; they can be trained to grow on trellises, providing a natural, green backdrop.
Succulents and cacti are low-maintenance options that thrive in containers.
Finally, use window boxes for flowers or herbs to maximize your space efficiently.
These simple additions make your patio feel more inviting and connected to nature.
Creative Flooring Solutions
 Save
Transforming your patio with creative flooring solutions can dramatically change its look and feel without costing a fortune. You don’t need to break the bank to add style and comfort underfoot.
Here are some affordable options to consider:
- Outdoor Rugs: A vibrant, weather-resistant rug can instantly add color and define your patio space. Look for sales or discount stores for budget-friendly options.
- Interlocking Deck Tiles: Easy to install and available in various materials like wood or composite, these tiles make a quick and stylish upgrade.
- Gravel: A low-cost and low-maintenance choice, gravel can be spread over a landscape fabric to create a chic, rustic look.
- Stencil Painted Concrete: If you have a concrete patio, use stencils and outdoor paint to create unique patterns and designs, giving it a custom look.
Personal Touches
 Save
Once you’ve set the foundation with creative flooring solutions, it’s time to infuse your patio with personal touches that reflect your style and personality.
Start by adding vibrant cushions and throw pillows to your seating area. They’re affordable and can be easily swapped out with the seasons.
Hang string lights or lanterns to create a warm, inviting ambiance for evening relaxation.
Incorporate potted plants and herbs to add greenery and a fresh scent.
Displaying a few pieces of art or DIY projects on walls can make the space distinctly yours.
Don’t forget a cozy blanket for chilly nights.
These simple, budget-friendly additions will transform your patio into a personalized retreat you’ll love spending time in.
 Save
 Save
 Save
 Save
 Save
 Save
 Save
 Save
 Save
 Save
 Save
 Save
 Save
 Save
 Save
 Save
 Save
 Save
 Save
 Save
 Save
 Save
 Save
 Save
 Save
 Save
 Save
 Save
 Save
 Save
 Save
 Save
 Save
Follow Quiet Minimal on Pinterest for more home design tips and inspiration.
From the guides
You've saved it, wanted it. Here's the how: codes, measurements, order. Your choices make it yours.
The Japandi Honest PlaybookThe honest version of the style: what to keep, what to skip, and the order to do it in.See inside →The Room Refresh PlaybookA repeatable four-step method, room by room, in ten minutes, thirty minutes, or one weekend.See inside →Make Any Room Feel Cozy on PurposeWhy some rooms hold people and others empty out, and the moves that change it.See inside → Save


